阅读前须知-点我下拉
本笔记参考哔哩哔哩 CSDN Java教程
大部分内容涵盖Java入门知识,理论+题目相结合
这个教程是我写过最长的教程,接近4万字,请你放下手机,关闭抖音,耐心学习
建议使用AI,先实操,再看答案,不懂的复制代码块问AI哪里有问题
如果有问题,请及时添加我的QQ或者微信纠错,万分感谢!
Java 基础
Java有什么好介绍的,高级,通用,内存安全,面向对象的高级编程语言,语法和C语言大差不差,好了你已经了解了,往下看吧。
等等,等等,在正式开始学习Java之前,还是需要先了解几个核心概念:
- JVM(Java Virtual Machine):Java虚拟机,是运行Java字节码的引擎,实现"一次编写,到处运行"
- JRE(Java Runtime Environment):Java运行环境,包含JVM和核心类库
- JDK(Java Development Kit):Java开发工具包,包含JRE和开发工具(编译器javac、调试器等)
- 编译与运行:Java源文件(.java) → 编译(javac) → 字节码(.class) → 运行(java)
行了,知道你看不懂了小老弟,了解即可,接下来,请打开你的IDEA或者eclipse等编译器,进行正式的学习之旅!
一定要理论+实操,看会了不等于真的会了。
Java 的基本语法
初始Java,如果你是一个完全没有编程基础的小白,请认真听讲!
下面的Java程序的 基本结构、命名规则、编码规范等。
成为一个好的程序员,写代码的规范也是必须的。
- 第一个Java程序
1
2
3
4
5
6
7
// HelloWorld.java
public class HelloWorld {
public static void main(String[] args) {
System.out.println("Hello, Java!");
}
}
// 输出 Hello, Java!
程序解析:
public class HelloWorld:这句话意思是定义了一个公共类,什么是公共类,你别管,你现在只要知道:HelloWorld必须要和你的文件名(HelloWorld.java)一致,其他的照抄就行,后面的章节会有详细讲解。public static void main(String[] args):Java程序的入口方法,格式固定,照抄即可,版本比较新的IDEA编译器直接输出main回车即可补全。System.out.println():标准输出语句,打印并换行,先记住。
-
Java注释
Java支持三种注释方式:1
2
3
4
5
6
7
8
9
10
11
12
13// 1. 单行注释:以 // 开头,// 后的所有内容为注释
/*
* 2. 多行注释:以 /* 开头,以 */ 结尾
* 中间所有内容均为注释
*/
/**
* 3. 文档注释:以 /** 开头,以 */ 结尾
* 可以通过 javadoc 工具生成API文档
* PyTs1n9
* 1.0
*/ -
Java关键字
Java中有50个关键字,具有特殊含义,不能用作标识符命名。常见的如:class、public、static、void、int、if、for、while、new、return等,先记着,慢慢来。
Java 的变量
变量是程序在内存中存储数据的容器,每个变量都有特定的数据类型。
讲那么复杂,其实就像是大房子,小房子,大人进大房子,小孩进小房子,类型和容器必须一一对应。
-
变量的定义与赋值
1
2
3
4
5
6
7
8
9
10
11
12
13/*
* 格式:数据类型 变量名 = 变量值;
*/
// 先声明,后赋值
int age;
age = 18;
// 声明的同时赋值
String name = "PyTs1n9";
// 同一行声明多个同类型变量
int a = 1, b = 2, c = 3; -
Java的基本数据类型
Java是强类型语言,变量必须先声明类型才能使用,上述示例也说明了不论什么时候赋值,第一步都是声明变量的类型,就是这个房子是大的还是中的还是小的。
基本数据类型分为四类八种:
| 类型 | 关键字 | 占用字节 | 取值范围 | 默认值 |
|---|---|---|---|---|
| 字节型 | byte | 1 | -128 ~ 127 | 0 |
| 短整型 | short | 2 | -32768 ~ 32767 | 0 |
| 整型 | int | 4 | -2^31 ~ 2^31-1 | 0 |
| 长整型 | long | 8 | -2^63 ~ 2^63-1 | 0L |
| 单精度浮点 | float | 4 | ±3.4E-38 ~ ±3.4E+38 | 0.0f |
| 双精度浮点 | double | 8 | ±1.7E-308 ~ ±1.7E+308 | 0.0d |
| 字符型 | char | 2 | 0 ~ 65535(Unicode) | ‘’ |
| 布尔型 | boolean | 1(JVM依赖) | true / false | false |
1 | // 各数据类型的定义示例 |
- 引用数据类型
除了八种基本数据类型,其余都是引用数据类型,如:String(字符串)、数组、类、接口等。
引用数据类型的定义是:用来存储对象内存地址的数据类型。暂且先了解。
1 | // String 是引用类型,但使用起来像基本类型 |
- 类型转换
不同类型之间相互转换:有自动类型转换(隐式)和强制类型转换(显式)
巧记一下:
我们会慢慢不停长大,它就是“自动”的,所以是小->大范围;
但是我们长大了,就很难缩小了,所以想缩小,就要“强制”,所以是大->小范围。
茅塞顿开了么小老弟。
1 | /* |
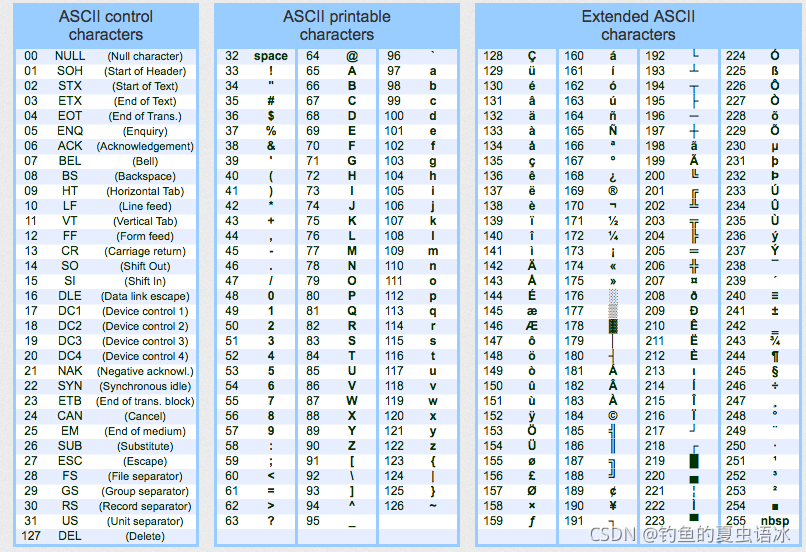
ASCII码表参考 图片来源CSDN@钓鱼的夏虫语冰:
Java 的运算符
运算符用于对变量和字面量进行运算操作,是程序逻辑的基础。
和数学中的符号类似。
- 算术运算符
| 运算符 | 描述 | 示例 (int a=10, b=3) |
|---|---|---|
| + | 加 | a + b = 13 |
| - | 减 | a - b = 7 |
| * | 乘 | a * b = 30 |
| / | 除(取商) | a / b = 3 |
| % | 取模(取余) | a % b = 1 |
| ++ | 自增 | a++(后置),++a(前置) |
| – | 自减 | a–(后置),–a(前置) |
1 | int a = 10, b = 3; |
- 赋值运算符
| 运算符 | 描述 | 等效表达式 |
|---|---|---|
| = | 赋值 | a = b |
| += | 加后赋值 | a = a + b |
| -= | 减后赋值 | a = a - b |
| *= | 乘后赋值 | a = a * b |
| /= | 除后赋值 | a = a / b |
| %= | 取余后赋值 | a = a % b |
1 | int num = 10; |
- 比较运算符(关系运算符)
| 运算符 | 描述 | 示例 (a=10, b=3) |
|---|---|---|
| == | 等于 | a == b → false |
| != | 不等于 | a != b → true |
| > | 大于 | a > b → true |
| < | 小于 | a < b → false |
| >= | 大于等于 | a >= b → true |
| <= | 小于等于 | a <= b → false |
1 | int a = 10, b = 3; |
- 逻辑运算符
| 运算符 | 描述 | 说明 |
|---|---|---|
| && | 逻辑与(短路与) | 两边为true才为true;左边false时不执行右边 |
| || | 逻辑或(短路或) | 任意一边true则为true;左边true时不执行右边 |
| ! | 逻辑非 | 取反,true变false,false变true |
| & | 逻辑与(不短路) | 两边都执行 |
| | | 逻辑或(不短路) | 两边都执行 |
1 | int x = 3, y = 5; |
- 三元运算符(条件运算符)重点
1 | /* |
练手题:有两个变量
int score = 85;,请用三元运算符判断成绩是否及格(≥60为及格),输出"及格"或"不及格"。
点击查看答案
1 | int score = 85; |
键盘输入 Scanner
Scanner 是 Java 提供的用于接收键盘输入的工具类,位于 java.util 包中
目前你只要知道:System.out.println()是输出,Scanner是输入。
-
Scanner 的基本使用
为了给后文引入一些思想,这里我会提前讲一下本段代码的第一行是什么含义:
import java.util.Scanner;是导入Scanner类,从Java语言底层一次性讲透:
import:Java中的关键字。用于导入包(Package),相当于是给当前的文件导入了一些现成的功能,比如当前案例导入了输入的功能。
java:根包名。是Java的核心库,所有的Java类都存放在这个目录下。
util:子包名,全称是utility(实用工具),包含了各种使用的工具类。
Scanner:类名。是一个文本扫描器,作用就是解析数据,在控制台进行输入。
.:这个点的门道是最大的,在Java中,这个“.”可以当作是“的”的意思。这句话整体翻译过来就是:导入在java包中的util包中的Scanner类。1
2
3
4
5
6
7
8
9
10
11
12
13
14
15
16
17
18
19
20
21
22
23
24
25
26
27// 1. 导入Scanner类(必须在类定义之前)
import java.util.Scanner;
public class ScannerDemo {
public static void main(String[] args) {
// 2. 创建Scanner对象
Scanner scanner = new Scanner(System.in);
// 3. 接收不同类型的数据
System.out.print("请输入一个整数:");
int num = scanner.nextInt(); // 接收int
System.out.print("请输入一个小数:");
double d = scanner.nextDouble(); // 接收double
System.out.print("请输入一个字符串:");
String str = scanner.next(); // 接收字符串(以空白字符结束)
// 4. 输出接收的数据
System.out.println("整数: " + num);
System.out.println("小数: " + d);
System.out.println("字符串: " + str);
// 5. 关闭Scanner(释放资源)
scanner.close();
}
}- 我会从底层的角度去解释这行代码
Scanner scanner = new Scanner(System.in);
Scanner:这是一个类。属于 Java 的 java.util 包。
scanner:自定义的变量名称。它可以是合法规范内的任何名称。
=:赋值运算符。将右边创建的 Scanner 对象赋值给左边的 scanner 变量。
new:Java关键字。在内存中实例化一个新对象,意思就是底层创建了一个对象的空间位置。
Scanner(System.in):Scanner类的构造方法。System.in 代表标准输入流,通常对应着键盘输入。这告诉 Scanner 对象应该从键盘读取数据。
总结一下:实例化了Scanner类中的一个有输入功能System.in的对象,并把这个对象赋值给名为scanner的变量。 - 同样的,我依然会从底层的角度去解释这行代码
int num = scanner.nextInt();
int:整数类型。告诉计算机,num只能存储整数。
num:变量名。是贴着int标签的盒子。
scanner:对象名称。此时它已经被赋值给scanner这个变量里了。
.nextInt():动作方法。这个是scanner对象的一个功能方法,它的作用是让程序暂停,等待用户在键盘上输入一个整数。当用户输入数字并按下回车键后,它会读取这个整数并将其返回。
总结一下:调用scanner中接受整数nextInt()的方法,并把对应的值复制给num
- 我会从底层的角度去解释这行代码
-
Scanner 的常用方法
| 方法 | 说明 |
|---|---|
| nextInt() | 接收一个 int 类型整数 |
| nextDouble() | 接收一个 double 类型小数 |
| nextFloat() | 接收一个 float 类型小数 |
| nextLong() | 接收一个 long 类型整数 |
| nextBoolean() | 接收一个 boolean 类型值 |
| next() | 接收一个字符串(遇到空格/换行结束) |
| nextLine() | 接收一整行字符串(可包含空格) |
1 | import java.util.Scanner; |
如果你先用 nextInt()、nextDouble()、next() 读取数字或单词,然后再用 nextLine() 接整行文本,中间一定要补一个 sc.nextLine() 吃掉回车!
如果你连续用多个 nextLine() 是不需要清除的,它们天然就处理好了换行。
编写一个程序,实现以下功能:
- 提示用户输入姓名(可能带空格,如
张三 丰) - 提示用户输入年龄(整数)
- 输出:
你好,XXX!你明年就 XX 岁了。(年龄 +1)
点击查看参考答案
1 | import java.util.Scanner; |
选择结构语句
根据条件判断结果执行不同的代码分支,是程序逻辑控制的核心
-
if 语句
1
2
3
4
5
6
7
8
9
10
11
12
13
14
15
16
17
18
19
20
21
22
23
24
25
26
27
28
29
30
31
32
33/*
* 格式1:if (条件) { 代码块 }
*/
int age = 20;
if (age >= 18) {
System.out.println("你已成年"); // 输出: 你已成年
}
/*
* 格式2:if (条件) { 代码块1 } else { 代码块2 }
*/
int score = 55;
if (score >= 60) {
System.out.println("及格"); // 输出: 及格
} else {
System.out.println("不及格"); // 输出: 不及格
}
/*
* 格式3:if (条件1) { 代码块1 } else if (条件2) { 代码块2 } ... else { 代码块N }
*/
int grade = 85;
if (grade >= 90) {
System.out.println("优秀"); // 输出:优秀
} else if (grade >= 80) {
System.out.println("良好"); // 输出: 良好
} else if (grade >= 70) {
System.out.println("中等"); // 输出:中等
} else if (grade >= 60) {
System.out.println("及格"); // 输出:及格
} else {
System.out.println("不及格"); // 输出:不及格
} -
switch 语句
1
2
3
4
5
6
7
8
9
10
11
12
13
14
15
16
17
18
19
20
21
22
23
24
25
26
27
28
29
30
31
32
33
34
35
36/*
* switch 用于等值判断,JDK 7+ 支持 String 类型
*/
int day = 3;
switch (day) {
case 1:
System.out.println("星期一:开会");
break; // 跳出switch,如果没有break会穿透到下一个case
case 2:
System.out.println("星期二:写代码"); // 输出: 星期二:写代码
break;
case 3:
System.out.println("星期三:测试"); // 输出: 星期三:测试
break;
case 4:
case 5:
System.out.println("工作日"); // case穿透:4和5都执行这里
break;
default:
System.out.println("周末:休息"); // 以上都不匹配时执行
break;
}
// switch 支持 String(JDK 7+)
String season = "春天";
switch (season) {
case "春天":
System.out.println("春暖花开");
break;
case "夏天":
System.out.println("夏日炎炎");
break;
default:
System.out.println("其他季节");
break;
} -
JDK 14+ 新式 switch 表达式,确实是有点新了,老一辈艺术家依旧坚持手搓JDK 7+
1
2
3
4
5
6
7
8
9// 箭头简化写法(JDK 14+)
int dayNum = 3;
String result = switch (dayNum) {
case 1 -> "星期一";
case 2 -> "星期二";
case 3 -> "星期三";
default -> "其他";
};
System.out.println(result);
🧪 练手题:季节判断器
输入一个表示月份的整数(1~12),输出对应的季节:3~5 月为春天,6~8 月为夏天,9~11 月为秋天,12、1、2 月为冬天。请分别用 if-else if-else 和 switch 两种方式实现。
📝 点击查看参考答案
写法一:if-else if-else
1 | int month = 8; // 可改为任意 1~12 |
写法二:switch(利用 case 穿透)
1 | int month = 8; |
写法三:JDK 14+ 箭头 switch (了解即可)
1 | int month = 8; |
循环语句
重复执行一段代码块,直到满足退出条件为止。Java中有 for、while、do-while 三种循环结构
-
for 循环
1
2
3
4
5
6
7
8
9
10
11
12
13
14
15
16
17
18
19
20
21
22
23/*
* 格式:for (初始化; 条件判断; 条件控制) { 循环体 }
* 执行顺序:初始化 → 条件判断(true) → 循环体 → 条件控制 → 条件判断...直到条件为false
*/
// 输出 0 到 4
for (int i = 0; i < 5; i++) {
System.out.println("i = " + i);
}
// 计算 1 到 100 的累加和
int sum = 0;
for (int i = 1; i <= 100; i++) {
sum += i;
}
System.out.println("1到100的和: " + sum); // 输出 5050
// for 循环嵌套:打印九九乘法表
for (int i = 1; i <= 9; i++) {
for (int j = 1; j <= i; j++) {
System.out.print(j + "*" + i + "=" + (i * j) + "\t");
}
System.out.println(); // 换行
} -
while 循环
1
2
3
4
5
6
7
8
9
10
11
12
13
14
15
16
17
18
19/*
* 格式:while (条件) { 循环体 }
* 先判断条件,条件为true才执行循环体
*/
// 输出 0 到 4
int i = 0;
while (i < 5) {
System.out.println("i = " + i);
i++;
}
// 用 while 计算 1 到 100 的累加和
int sum = 0, n = 1;
while (n <= 100) {
sum += n;
n++;
}
System.out.println("1到100的和: " + sum); // 输出 5050 -
do-while 循环
1
2
3
4
5
6
7
8
9/*
* 格式:do { 循环体 } while (条件);
* 先执行一次循环体,再判断条件;至少执行一次
*/
int count = 0;
do {
System.out.println("无论条件如何,这行至少输出一次");
count++;
} while (count < 0); // 条件为false,但因为 do-while 特性已经执行了一次 -
循环控制语句
| 语句 | 说明 |
|---|---|
| break | 跳出当前循环(终止循环) |
| continue | 跳过本次循环的剩余部分,进入下一次循环 |
| return | 结束整个方法 |
1 | // break:找到第一个能被3和5同时整除的数就退出 |
🧪 3个练手题
以下三道题目用于巩固循环语句的掌握,建议先独立完成再查看答案
题目一:打印九九乘法表
用 for 循环嵌套打印出如下格式的九九乘法表:
1 | 1*1=1 |
📝 点击查看答案
1 | for (int i = 1; i <= 9; i++) { |
题目二:打印沙漏
用 for 循环嵌套打印如下沙漏形状(共7行,由 * 和空格组成):
1 | ******* |
📝 点击查看答案
1 | int n = 7; // 沙漏的总高度(必须是正奇数) |
题目三:打印所有水仙花数
水仙花数(Narcissistic Number):一个三位数,其各位数字的立方和等于该数本身。
例如:153 = 1³ + 5³ + 3³ = 1 + 125 + 27 = 153
用循环找出 100 到 999 之间的所有水仙花数并打印。
期望输出:153 370 371 407
📝 点击查看答案
1 | for (int num = 100; num <= 999; num++) { |
方法 重点!
方法是完成某个特定功能的代码块,是Java程序的基本组织单元。
在别的编程语言中也叫函数。
-
方法的定义与调用
进入方法的教学前首先要了解2个定义:形参和实参。
理清楚这2个词的区别,才能把方法的传递弄清楚。形参(形式参数):方法定义时小括号内的参数变量,用来接收调用者传递的数据。
比如add(int a, int b)中的a和b就是形参——它们只是"占位符",在方法被调用之前不占用内存。实参(实际参数):方法调用时小括号内实际传递的数据。
比如add(10, 20)中的10和20就是实参——它们是真正参与运算的具体值。简单记忆:定义时是形参,调用时是实参。
1
2
3
4
5
6
7
8
9
10
11
12
13
14
15
16
17
18
19
20
21
22
23
24
25/*
* 格式:
* 修饰符 返回值类型 方法名(参数类型 参数名, ...) {
* 方法体;
* return 返回值; // 如果返回值类型是void,return可省略
* }
*/
// 这里的static关键字先不管,照抄就行,后续会讲。
// 无参数无返回值的方法 void
public static void sayHello() {
System.out.println("Hello, Java!");
}
// 有参数有返回值的方法 int
public static int add(int a, int b) {
return a + b;
}
// 调用方法 xxxx() 带括号的都是方法
public static void main(String[] args) {
sayHello(); // 输出: Hello, Java!
int sum = add(10, 20);
System.out.println("sum = " + sum); // 输出: sum = 30
} -
方法重载(Overload)
在同一个类中定义多个同名方法,但参数列表不同(参数个数、类型、顺序至少有一个不同)
1
2
3
4
5
6
7
8
9
10
11
12
13
14
15
16
17// 方法重载:同名方法,参数不同
public static int add(int a, int b) {
return a + b;
}
public static int add(int a, int b, int c) {
return a + b + c; // 参数个数不同
}
public static double add(double a, double b) {
return a + b; // 参数类型不同
}
// 调用时,编译器根据传入参数自动匹配
System.out.println(add(1, 2)); // 调用第一个,输出 3
System.out.println(add(1, 2, 3)); // 调用第二个,输出 6
System.out.println(add(1.5, 2.5)); // 调用第三个,输出 4.0注意:方法重载与返回值类型无关,仅靠返回值类型不同不能构成重载!
-
方法的参数传递
1
2
3
4
5
6
7
8
9
10
11
12
13
14
15
16
17
18
19
20
21
22
23
24
25/*
* 基本数据类型参数:传递的是值的副本(值传递),不影响原变量
* 引用数据类型参数:传递的是地址的副本,可能影响原对象
*/
// 基本类型参数(值传递)
public static void change(int x) {
x = 100; // 修改的是局部变量x,不影响调用处的变量
}
// 引用类型参数(传递引用)
public static void changeArray(int[] arr) {
arr[0] = 100; // 修改了数组内容,会影响调用处的数组
}
// 测试
public static void main(String[] args) {
int num = 10;
change(num);
System.out.println(num); // 输出 10(未改变)
int[] arr = {1, 2, 3};
changeArray(arr);
System.out.println(arr[0]); // 输出 100(已改变)
}
🧪 2个练手题
这里给出了完整代码,请独立先思考,再复制放入编译器运行,建议先独立完成再查看答案
题目1 — 参数传递辨析
阅读以下代码,写出程序的输出结果:
1 | // 0基础的小白看不懂数组可以先跳过这题!!!因为下一章就是数组了^_^ |
点击查看答案
1 | swap内: a=20, b=10 |
题目2 — 方法重载判断
阅读以下代码,写出每条输出语句调用了哪个版本的方法(以及输出内容):
1 | public class Test { |
点击查看答案
1 | int版本: 5 |
数组
数组是一个存储相同类型数据的容器,可以存储多个同类型数据。数组长度固定,创建后不可改变
-
数组的定义与初始化
1
2
3
4
5
6
7
8
9
10
11
12
13
14
15
16
17
18/*
* 格式:
* 动态初始化:数据类型[] 数组名 = new 数据类型[长度];
* 静态初始化:数据类型[] 数组名 = {元素1, 元素2, ...};
*/
// 动态初始化(只指定长度,默认值为0/0.0/false/null)
int[] arr1 = new int[5]; // 长度为5的int数组,默认值都是0
arr1[0] = 10; // 通过索引赋值(索引从0开始)
arr1[1] = 20;
// 静态初始化(直接指定元素)
int[] arr2 = {1, 2, 3, 4, 5};
String[] names = {"张三", "李四", "王五"};
// 两种数组声明方式(推荐第一种)
int[] a; // 推荐
int b[]; // 可用但不推荐(C语言遗留风格) -
数组的访问与遍历
1
2
3
4
5
6
7
8
9
10
11
12
13
14
15
16
17
18
19int[] arr = {10, 20, 30, 40, 50};
// 通过索引访问
System.out.println("第一个元素: " + arr[0]); // 10
System.out.println("数组长度: " + arr.length); // 5(length是属性不是方法)
// 方式1:for循环遍历
for (int i = 0; i < arr.length; i++) {
System.out.println("arr[" + i + "] = " + arr[i]);
}
// 方式2:增强for循环(foreach)
for (int element : arr) {
System.out.println(element); // 依次输出10, 20, 30, 40, 50
}
// 方式3:Arrays.toString() 快速打印
import java.util.Arrays;
System.out.println(Arrays.toString(arr)); // 输出 [10, 20, 30, 40, 50] -
数组的常见操作
1
2
3
4
5
6
7
8
9
10
11
12
13
14
15
16
17
18
19
20
21
22
23
24
25
26
27// 求最大值
int[] arr = {45, 23, 67, 12, 89, 34};
int max = arr[0];
for (int i = 1; i < arr.length; i++) {
if (arr[i] > max) {
max = arr[i];
}
}
System.out.println("最大值: " + max); // 89
// 数组反转
int[] arr2 = {1, 2, 3, 4, 5};
for (int i = 0, j = arr2.length - 1; i < j; i++, j--) {
int temp = arr2[i];
arr2[i] = arr2[j];
arr2[j] = temp;
}
System.out.println(Arrays.toString(arr2)); // [5, 4, 3, 2, 1]
// i = 0 从左边开始 (0)
// j = arr2.length-1 从右边开始 (4)
// i < j 两个指针没碰到就继续
// i++, j-- 每次循环后,i右移,j左移
// 数组排序
int[] arr3 = {5, 2, 8, 1, 9};
Arrays.sort(arr3); // 使用Arrays工具类排序
System.out.println(Arrays.toString(arr3)); // [1, 2, 5, 8, 9] -
二维数组
1
2
3
4
5
6
7
8
9
10
11
12
13
14
15
16
17
18
19
20
21
22
23
24// 二维数组的定义
int[][] matrix = {
{1, 2, 3},
{4, 5, 6},
{7, 8, 9}
};
// 遍历二维数组
for (int i = 0; i < matrix.length; i++) {
for (int j = 0; j < matrix[i].length; j++) {
System.out.print(matrix[i][j] + " ");
}
System.out.println();
}
// 输出:
// 1 2 3
// 4 5 6
// 7 8 9
// 不规则二维数组(每行列数可以不同)
int[][] jagged = new int[3][];
jagged[0] = new int[2]; // 第0行有2列
jagged[1] = new int[4]; // 第1行有4列
jagged[2] = new int[3]; // 第2行有3列
🧪 3个练手题
以下3道题目用于巩固数组的定义、遍历、常见操作和二维数组的掌握
题目1 — 数组遍历与统计
定义一个int数组 {34, 56, 12, 89, 45, 23, 78},计算并输出:数组所有元素的和、平均值(保留一位小数)、以及大于平均值的有哪些元素。
点击查看答案
参考代码:
1 | int[] arr = {34, 56, 12, 89, 45, 23, 78}; |
输出:
总和: 337
平均值: 48.1
大于平均值的元素: 56 89 78
关键点:计算平均值时 sum * 1.0 / arr.length 将int提升为double,避免整数除法丢失小数。
题目2 — 数组反转(原地操作)
不使用额外的数组,原地将一个int数组 {1, 2, 3, 4, 5, 6, 7} 反转,并输出反转前后的数组。
点击查看答案
参考代码:
1 | import java.util.Arrays; |
输出:
反转前: [1, 2, 3, 4, 5, 6, 7]
反转后: [7, 6, 5, 4, 3, 2, 1]
关键点:使用双指针(i从头、j从尾),交换到i>=j停止。只需要arr.length/2次交换。
题目3 — 二维数组对角线求和
定义一个3×3的二维int数组:
1 | {1, 2, 3} |
分别计算并输出主对角线(左上到右下)和副对角线(右上到左下)的元素之和。
点击查看答案
参考代码:
1 | int[][] matrix = { |
输出:
主对角线之和: 15 (1+5+9)
副对角线之和: 15 (3+5+7)
关键点:主对角线下标满足 i==j;副对角线下标满足 i+j==n-1。中心元素5被两条对角线各算一次。
面向对象思想
面向对象编程(OOP, Object-Oriented Programming)是一种以对象为中心的编程范式,通过封装、继承、多态等机制来组织代码
- 面向对象 vs 面向过程
- 面向过程:关注步骤和流程,一步一步完成功能。如:倒水 → 烧水 → 放茶叶 → 泡茶 → 出茶
- 面向对象:关注对象和角色。如:人(倒水、放茶叶)、水壶(烧水)、茶杯(盛茶)
- 面向对象的三大特征
| 特征 | 说明 |
|---|---|
| 封装 (Encapsulation) | 隐藏内部实现细节,对外暴露可控的访问接口 |
| 继承 (Inheritance) | 子类继承父类的属性和方法,实现代码复用 |
| 多态 (Polymorphism) | 同一个行为具有不同表现形式,提高代码灵活性 |
- 类与对象的关系
- 类(Class):是对象的模板/蓝图,描述了一类事物的共同特征(属性)和行为(方法)
- 对象(Object):是类的具体实例,通过类创建出来的真实存在的个体
类是抽象的模板,对象是具体的实例。好比"手机图纸"(类)与"你手中的手机"(对象)的关系。
🧪 1个练手题
以下1道题目用于巩固面向对象三大特征的理解
题目1 — 识别面向对象的特征
分析以下三个场景分别体现了面向对象的哪个特征:
场景A:手机的内部芯片和电路被外壳隐藏,用户只需通过触摸屏幕和按键来操作,无需了解内部如何实现。
场景B:iPhone 和 Android 手机都是手机,但它们的操作系统、交互方式各有特色——同样是"打电话"这个行为,不同手机有不同实现。
场景C:智能手机继承了普通手机的通话、短信功能,同时扩展了上网、拍照等新功能。
点击查看答案
场景A - 封装(Encapsulation):将内部实现隐藏起来,只暴露出简单的操作接口。用户不需要知道芯片怎么工作,只需点击屏幕即可。
场景B - 多态(Polymorphism):同一个行为(打电话)在不同的对象上表现出不同的形态。iPhone和Android各有各的拨号界面和通话方式。
场景C - 继承(Inheritance):子类(智能手机)复用父类(普通手机)已有的功能(通话、短信),并增加新的功能(上网、拍照)。
类是Java程序的基本组成单位。对象是类的实例化结果,通过new关键字创建
-
类的定义
1
2
3
4
5
6
7
8
9
10
11
12
13
14
15
16
17
18
19
20
21
22
23
24
25
26/*
* 格式:
* public class 类名 {
* // 成员变量(属性):描述对象的状态
* 数据类型 变量名;
*
* // 成员方法(行为):描述对象能做什么
* public 返回值类型 方法名(参数) { ... }
* }
*/
public class Student {
// 成员变量(属性)
String name; // 姓名
int age; // 年龄
double score; // 分数
// 成员方法(行为)
public void study() {
System.out.println(name + "正在学习...");
}
public void showInfo() {
System.out.println("姓名: " + name + ", 年龄: " + age + ", 分数: " + score);
}
} -
对象的创建与使用
1
2
3
4
5
6
7
8
9
10
11
12
13
14
15
16
17
18
19
20
21public class TestStudent {
public static void main(String[] args) {
// 创建对象:类名 对象名 = new 类名();
Student stu1 = new Student();
// 给成员变量赋值
stu1.name = "张三";
stu1.age = 18;
stu1.score = 95.5;
// 调用成员方法
stu1.study(); // 输出: 张三正在学习...
stu1.showInfo(); // 输出: 姓名: 张三, 年龄: 18, 分数: 95.5
// 可以创建多个对象,它们互相独立
Student stu2 = new Student();
stu2.name = "李四";
stu2.age = 20;
stu2.showInfo(); // 输出: 姓名: 李四, 年龄: 20, 分数: 0.0
}
} -
成员变量与局部变量的区别
| 区别 | 成员变量 | 局部变量 |
|---|---|---|
| 定义位置 | 类中、方法外 | 方法内或参数列表 |
| 默认值 | 有默认值(0/0.0/false/null) | 无默认值,必须先赋值 |
| 生命周期 | 随对象存在 | 随方法调用结束而销毁 |
| 存储位置 | 堆内存 | 栈内存 |
1 | public class Demo { |
🧪 2个练手题
以下2道题目用于巩固类的定义、对象创建和成员变量与局部变量的区别
题目1 — 定义一个"图书"类
定义一个Book类,包含:书名(name)、作者(author)、价格(price)三个成员变量,以及一个showInfo()方法用于打印图书信息。然后创建两个Book对象,分别赋值并调用showInfo()。
点击查看答案
参考代码:1 | public class Book { |
输出:
书名: Java入门, 作者: 张三, 价格: 59.9
书名: 数据结构, 作者: 李四, 价格: 49.9
关键点:每个对象拥有独立的成员变量副本,互相不影响。
题目2 — 成员变量 vs 局部变量
阅读以下代码,写出输出结果,并说明为什么两个变量表现不同:
1 | public class Demo { |
点击查看答案
输出:
成员变量a=0
赋值后b=10
被注释的那行不能编译通过。原因:
- 成员变量a有默认值(0),定义后不赋值也能直接使用。
- 局部变量b没有默认值,必须先赋值才能使用。如果取消注释 System.out.println(“局部变量b=” + b) 这行,编译会报错"变量b可能尚未初始化"。
封装
封装是将对象的属性和实现细节隐藏起来,仅对外暴露公共的访问方式。通过private关键字和getter/setter方法实现
-
private 关键字
1
2
3
4
5
6
7
8
9
10
11
12
13
14
15
16
17
18
19
20
21
22
23
24
25
26
27
28
29
30
31
32
33
34
35
36
37
38
39
40
41
42
43
44
45/*
* private 是访问权限修饰符,表示私有的
* 被 private 修饰的成员只能在本类中访问,外界无法直接访问
*/
public class Person {
private String name; // 私有成员变量,外部无法直接访问
private int age;
// 提供公共的 getter/setter 方法控制访问
public void setName(String name) {
// 可以在setter中进行数据校验
if (name != null && name.length() >= 2) {
this.name = name;
} else {
System.out.println("姓名不合法!");
}
}
public String getName() {
return name;
}
public void setAge(int age) {
if (age >= 0 && age <= 150) {
this.age = age;
} else {
System.out.println("年龄不合法!");
}
}
public int getAge() {
return age;
}
}
// 使用封装后的类
public class Test {
public static void main(String[] args) {
Person p = new Person();
// p.name = "张三"; // 编译错误!name是private,不能直接访问
p.setName("张三"); // 通过setter设置
p.setAge(18);
System.out.println(p.getName() + ", " + p.getAge()); // 张三, 18
}
} -
四种访问权限修饰符
| 修饰符 | 本类 | 同包 | 子类 | 所有类 | 说明 |
|---|---|---|---|---|---|
| private | ✓ | ✗ | ✗ | ✗ | 只有本类 |
| (default/空) | ✓ | ✓ | ✗ | ✗ | 同包访问 |
| protected | ✓ | ✓ | ✓ | ✗ | 子类可访问 |
| public | ✓ | ✓ | ✓ | ✓ | 全部可访问 |
封装的好处:提高代码安全性,隐藏实现细节,方便修改内部实现而不影响调用者。
🧪 2个练手题
以下2道题目用于巩固private关键字和getter/setter的封装模式
题目1 — 封装一个"账户"类
定义一个Account类,将余额(balance)用private修饰,并提供:
deposit(double money)存款方法(金额必须大于0)withdraw(double money)取款方法(余额不足时提示"余额不足")getBalance()获取余额
然后创建对象,存入500,取出200,打印最终余额。
点击查看答案
参考代码:
1 | public class Account { |
输出:
存入500.0元,当前余额: 500.0
取出200.0元,当前余额: 300.0
最终余额: 300.0
关键点:private修饰的balance外部无法直接访问,必须通过公共方法操作,可以在方法中添加校验逻辑保证数据安全。
题目2 — 访问权限判断
已知A类和B类在不同的包中(即B类需要import A所在的包),A类中定义了四个成员:
1 | // A类 (在 package com.example 中) |
B类(在不同包中)能访问A的哪几个成员?(写出编号即可)
点击查看答案
只能访问 ④ (public修饰的d)。
解析:
① private - 只有本类内部可访问,B类不行
② default(空) - 只有同包可访问,B类在不同包,不行
③ protected - 同包或子类可访问,B类如果没继承A且不同包,不行
④ public - 所有类都可访问,B类可以
如果B类继承了A(B extends A),则B可以访问③protected和④public,依然不能访问①和②。
构造方法
-
构造方法的定义
1
2
3
4
5
6
7
8
9
10
11
12
13
14
15
16
17
18
19
20
21
22
23
24
25
26
27
28
29
30
31
32
33
34
35
36
37
38
39
40
41/*
* 格式:
* public 类名(参数列表) {
* 初始化代码;
* }
* 特点:
* 1. 方法名与类名完全相同
* 2. 没有返回值类型(连void都不写)
* 3. 使用new关键字调用
* 4. 如果没有定义任何构造方法,编译器会提供默认的无参构造
*/
public class Student {
private String name;
private int age;
// 无参构造方法(若定义了有参构造,建议手动写出无参构造)
public Student() {
System.out.println("无参构造方法被调用");
}
// 有参构造方法
public Student(String name, int age) {
this.name = name;
this.age = age;
System.out.println("有参构造方法被调用");
}
public void show() {
System.out.println("姓名: " + name + ", 年龄: " + age);
}
}
// 使用构造方法创建对象
public class Test {
public static void main(String[] args) {
Student s1 = new Student(); // 调用无参构造
Student s2 = new Student("张三", 18); // 调用有参构造
s1.show(); // 姓名: null, 年龄: 0
s2.show(); // 姓名: 张三, 年龄: 18
}
}
注意:一旦手动定义了构造方法(无论有参还是无参),编译器将不再提供默认的无参构造方法。建议养成手动写无参构造的习惯。
-
构造方法的重载
1
2
3
4
5
6
7
8
9
10
11
12
13
14
15
16
17
18
19
20
21// 构造方法可以重载(参数列表不同)
public class Point {
private int x, y;
public Point() {
this(0, 0); // 调用本类的另一个构造方法
}
public Point(int x) {
this(x, 0); // 调用两参构造
}
public Point(int x, int y) {
this.x = x;
this.y = y;
}
public void show() {
System.out.println("(" + x + ", " + y + ")");
}
}
🧪 2个练手题
以下2道题目用于巩固构造方法的定义和重载
题目1 — 构造方法重载
定义一个Rectangle类,包含width和height两个private成员变量,提供三个构造方法:
- 无参构造:默认宽高都为1
- 单参构造:创建正方形(宽高相等)
- 两参构造:指定宽和高
再提供一个getArea()方法返回面积。创建三个对象分别使用三种构造方法,输出各自的面积。
点击查看答案
参考代码:
1 | public class Rectangle { |
输出:
无参: 1.0
正方形: 25.0
长方形: 12.0
关键点:三个构造方法参数列表不同(个数不同),构成重载。创建对象时编译器根据参数自动匹配。
题目2 — 默认构造方法
以下代码能否编译通过?如果不能,说明原因:
1 | public class Student { |
点击查看答案
第二行 Student s2 = new Student(); 编译错误!
原因:一旦手动定义了任何构造方法(这里定义了有参构造方法),编译器就不再自动提供默认的无参构造方法。所以 new Student() 找不到匹配的无参构造。
解决方法:手动添加一个无参构造方法:
1 | public Student() { |
这样 new Student() 就能编译通过了。养成习惯:只要定义了有参构造,顺手把无参构造也写出来。
this 关键字
-
this 的几种用法
1
2
3
4
5
6
7
8
9
10
11
12
13
14
15
16
17
18
19
20
21
22
23
24
25
26
27
28
29
30
31
32
33
34public class Student {
private String name;
private int age;
// 1. this.成员变量 —— 区分成员变量和局部变量同名的情况
public void setName(String name) {
this.name = name; // this.name是成员变量,name是参数(局部变量)
}
// 2. this(...) —— 构造方法中调用本类的其他构造方法
public Student() {
this("未命名", 0); // 必须写在构造方法的第一行!
System.out.println("无参构造");
}
public Student(String name, int age) {
this.name = name;
this.age = age;
}
// 3. this —— 作为方法的返回值,返回当前对象本身
public Student getInstance() {
return this;
}
// 4. this.方法名() —— 调用本类的其他方法
public void show() {
this.print(); // 调用本类的print方法(可省略this直接写print())
}
public void print() {
System.out.println("姓名: " + name + ", 年龄: " + age);
}
}
重要规则:this(…) 调用本类构造方法时,必须写在构造方法的第一行。一个构造方法中只能有一个 this(…) 调用。
🧪 2个练手题
以下2道题目用于巩固this关键字的核心用法
题目1 — this区分成员变量与局部变量
写出以下代码的输出结果:
1 | public class Person { |
点击查看答案
输出:name=null, age=18
解析:setName方法中 name = name 没有使用this,两个name都指的是参数(局部变量),遵循"就近原则"——自己给自己赋值,成员变量name没有被修改,保持默认值null。
setAge方法中 this.age = age 正确区分了成员变量(this.age)和局部变量(age),成员变量被成功赋值为18。
关键点:当局部变量与成员变量同名时,必须用this区分。this.变量名 = 成员变量,不带this的变量名就近匹配(优先局部变量)。
题目2 — this()调用构造方法
找出以下代码中的错误并修正:
1 | public class Point { |
点击查看答案
错误:this(0,0) 必须写在构造方法的第一行,不能写在 System.out.println() 之后。
修正后:
1 | public Point() { |
规则:this(…)调用本类其他构造方法时,必须是构造方法中的第一条语句。一个构造方法中最多只能有一个this(…)调用。
代码块
1 | public class BlockDemo { |
执行顺序:静态代码块(仅一次) > 构造代码块 > 构造方法。这个面试常考!
🧪 1个练手题
以下1道题目用于巩固代码块的执行顺序(面试高频考点)
题目1 — 代码块执行顺序
写出以下代码中各个块的执行顺序(只需写出"A B C D"这样的顺序即可):
1 | public class OrderTest { |
点击查看答案
输出顺序:A D B C B C
解析:
第1步 A - static代码块在类加载时执行(仅一次)
第2步 D - main方法开始执行
第3步 B - new第一个对象时,构造代码块先于构造方法执行
第4步 C - 构造方法执行
第5步 B - new第二个对象时,构造代码块再次执行
第6步 C - 构造方法再次执行
执行优先级:静态代码块(仅一次) > 构造代码块(每次new) > 构造方法(每次new)
static 关键字
-
static 修饰成员变量(类变量)
1
2
3
4
5
6
7
8
9
10
11
12
13
14
15
16
17
18
19
20
21
22
23
24
25
26
27
28public class Student {
private String name; // 实例变量(每个对象一份)
private static String school; // 类变量(所有对象共享一份)
public Student(String name) {
this.name = name;
}
public void show() {
System.out.println("姓名: " + name + ", 学校: " + school);
}
public static void setSchool(String s) {
school = s; // 静态方法可以访问静态变量
}
}
// 测试
public class Test {
public static void main(String[] args) {
Student.setSchool("清华大学"); // 通过类名调用静态方法
Student s1 = new Student("张三");
Student s2 = new Student("李四");
s1.show(); // 姓名: 张三, 学校: 清华大学
s2.show(); // 姓名: 李四, 学校: 清华大学(共享school)
}
} -
static 修饰成员方法(类方法)
1
2
3
4
5
6
7
8
9
10
11
12
13
14
15
16
17
18
19
20
21
22public class MathUtil {
// 静态方法:可以通过类名直接调用,无需创建对象
public static int add(int a, int b) {
return a + b;
}
public static int max(int a, int b) {
return a > b ? a : b;
}
// 普通方法:需要创建对象调用
public void sayHello() {
System.out.println("Hello");
}
}
// 调用
System.out.println(MathUtil.add(10, 20)); // 30(类名直接调用)
System.out.println(MathUtil.max(10, 20)); // 20
MathUtil util = new MathUtil();
util.sayHello(); // 普通方法,需要对象调用 -
static 的注意事项
1
2
3
4
5
6
7
8
9
10
11
12
13
14
15
16
17
18
19
20
21
22
23public class StaticDemo {
int instanceVar = 10; // 实例变量
static int staticVar = 20; // 静态变量
// 实例方法:可以访问实例变量和静态变量
public void instanceMethod() {
System.out.println(instanceVar); // 可以
System.out.println(staticVar); // 可以
staticMethod(); // 可以调用静态方法
}
// 静态方法:只能访问静态变量和静态方法
public static void staticMethod() {
// System.out.println(instanceVar); // 错误!静态方法不能直接访问实例变量
System.out.println(staticVar); // 可以
// instanceMethod(); // 错误!不能直接调用实例方法
// 只能通过创建对象来访问实例成员
StaticDemo demo = new StaticDemo();
System.out.println(demo.instanceVar); // 可以(通过对象)
demo.instanceMethod(); // 可以(通过对象)
}
}
核心规则:静态不能直接访问非静态,非静态可以访问静态。因为静态成员属于类,在对象创建之前就存在。
🧪 2个练手题
以下2道题目用于巩固static修饰变量和方法的核心规则
题目1 — 静态变量共享
写出以下代码的输出结果:
1 | public class Counter { |
点击查看答案
输出:0 1 2 3
解析:static变量count属于类本身,被所有对象共享。每创建一个对象,构造方法执行count++。所以count从0开始,每次new就+1,最终为3。
关键点:静态变量是所有对象共享的"计数器",不随某个对象销毁而减少。
题目2 — 静态方法不能直接访问实例成员
找出以下代码中的错误并说明原因:
1 | public class Demo { |
点击查看答案
①和③编译错误,②正常。
解析:
① System.out.println(num) 错误 —— 静态方法test()不能直接访问实例变量num。因为静态方法属于类,在没有对象时就存在;而实例变量num属于对象,只有创建对象后才存在。想访问需要先创建对象:new Demo().num。
③ show() 错误 —— 静态方法不能直接调用实例方法,原因同上。修正:new Demo().show()。
② System.out.println(sNum) 正确 —— 静态方法访问静态变量,没毛病。
核心规则:静态不能直接访问非静态(因为"类先于对象存在"),非静态可以随意访问静态。
继承
-
继承的基本语法
1
2
3
4
5
6
7
8
9
10
11
12
13
14
15
16
17
18
19
20
21
22
23
24
25
26
27
28
29
30
31
32
33
34
35
36
37
38
39
40
41
42
43
44/*
* 格式:
* public class 子类名 extends 父类名 { ... }
* Java只支持单继承(一个类只能有一个直接父类),但支持多层继承
*/
// 父类:动物
public class Animal {
private String name;
public void setName(String name) {
this.name = name;
}
public String getName() {
return name;
}
public void eat() {
System.out.println(name + "正在吃东西...");
}
}
// 子类:狗(继承自动物)
public class Dog extends Animal {
// Dog自动拥有父类的name属性、setName、getName、eat方法
// 还可以定义自己特有的方法
public void bark() {
System.out.println(getName() + "正在汪汪叫!");
}
}
// 测试
public class Test {
public static void main(String[] args) {
Dog dog = new Dog();
dog.setName("旺财"); // 使用父类的setName方法
dog.eat(); // 使用父类的eat方法
dog.bark(); // 使用自己特有的bark方法
// 输出:
// 旺财正在吃东西...
// 旺财正在汪汪叫!
}
} -
继承中的成员变量和方法访问
1
2
3
4
5
6
7
8
9
10
11
12
13
14
15
16
17
18
19
20
21
22
23
24// 父类
public class Father {
int age = 40;
public void show() {
System.out.println("Father的show方法");
}
}
// 子类
public class Son extends Father {
int age = 15; // 与父类同名的成员变量
// 方法重写注解(可选但建议写)
public void show() { // 重写父类的show方法
System.out.println("Son的show方法");
}
public void test() {
System.out.println(this.age); // 15(子类自己的age)
System.out.println(super.age); // 40(父类的age)
this.show(); // 调用子类的show
super.show(); // 调用父类的show
}
} -
方法重写(Override)
子类中重新定义与父类同名的方法,用于提供不同的实现。使用 @Override 注解标记
| 比较 | 方法重载(Overload) | 方法重写(Override) |
|---|---|---|
| 位置 | 同一个类 | 有继承关系的子类 |
| 方法名 | 相同 | 相同 |
| 参数列表 | 不同 | 相同 |
| 返回值 | 可同可不同 | 相同或有父子关系 |
| 访问权限 | 无要求 | 不能比父类更严格 |
| 关键词 | 无 | @Override |
1 | // 方法重写的示例 |
- 方法重载(Overload) vs 方法重写(Override)
方法重载(Overload)和方法重写(Override)是Java中两个非常容易混淆的概念,面试高频考点!它们都和方法有关,但使用场景和底层机制完全不同。
概念对比:
| 比较维度 | 方法重载(Overload) | 方法重写(Override) |
|---|---|---|
| 发生位置 | 同一个类中 | 有继承关系的子类中 |
| 方法名 | 必须相同 | 必须相同 |
| 参数列表 | 必须不同(个数/类型/顺序) | 必须相同 |
| 返回值类型 | 可以不同 | 必须相同(或为其子类,即协变返回类型) |
| 访问修饰符 | 无限制 | 不能比父类更严格 |
| 关键字 | 无需特殊标记 | 使用 @Override 注解(建议) |
| 绑定时机 | 编译时多态(静态绑定) | 运行时多态(动态绑定) |
| 目的 | 提供同一功能的多种调用方式 | 子类修改/扩展父类的行为 |
代码对比案例:
1 | // ========== 方法重载(Overload):同一个类中,方法名相同,参数不同 ========== |
易错点总结:
-
重载不看返回值类型:仅返回值不同不能构成重载,编译器会报错
1
2
3// ❌ 编译错误!仅返回值不同不构成重载
public int calc(int x) { return x; }
public double calc(int x) { return x * 1.0; } -
重写的访问权限不能更严格:父类方法是
protected,子类重写不能写成private1
2
3// ❌ 编译错误!父类是protected,子类不能降级为private
// @Override
// private void eat() { } -
@Override注解不是必须的,但强烈建议写上——它让编译器帮你检查是否真的在重写1
2
public void eat(String food) { } // 编译报错!父类没有 eat(String),这说明是重载不是重写 -
static 方法:可以重载,但不能重写(静态方法属于类,不存在多态)
-
构造方法:可以重载,但不能重写(构造方法名必须与类名相同)
🧪 2个练手题
以下2道题目用于巩固继承的基本语法和方法重写
题目1 — 方法重写练习
父类Vehicle有一个run()方法输出"交通工具在行驶"。请编写子类Car继承Vehicle并重写run()方法,输出"小汽车在公路上跑"。分别用父类引用和子类引用调用run(),观察输出。
点击查看答案
参考代码:
1 | public class Vehicle { |
关键点:
- 子类重写父类方法使用@Override注解(建议写,编译器会帮忙检查)
- 方法重写要求:方法名相同、参数列表相同、返回值兼容、访问权限不比父类更严格
- 当父类引用指向子类对象时,调用重写方法执行的是子类的版本(多态的基础)
题目2 — 继承链中的成员访问
阅读以下代码,写出输出结果:
1 | public class Grandpa { |
点击查看答案
输出:
age=15
Son hello
解析:
- System.out.println(“age=” + age) - 遵循"就近原则",在Son类中找到了age=15,输出15。
- hello() - Son类中重写了hello()方法,调用的是Son自己的版本。
补充:如果想在Son中访问Father的age或Grandpa的hello,需要使用super关键字(下节内容)。
super 关键字
-
super 的三种用法
1
2
3
4
5
6
7
8
9
10
11
12
13
14
15
16
17
18
19
20
21
22
23
24
25
26
27
28
29
30
31
32
33
34
35
36
37public class Father {
String name = "父亲";
public Father() {
System.out.println("Father 无参构造");
}
public Father(String name) {
this.name = name;
System.out.println("Father 有参构造");
}
public void sayHello() {
System.out.println("Hello from Father");
}
}
public class Son extends Father {
String name = "儿子";
public Son() {
// super(); // 默认调用父类无参构造(不写也自动执行)
super("传给父类"); // 调用父类有参构造(必须写第一行)
System.out.println("Son 无参构造");
}
public void test() {
// 1. super.成员变量 —— 访问父类的成员变量
System.out.println(super.name); // 父亲(父类的name)
System.out.println(this.name); // 儿子(自己的name)
// 2. super.成员方法 —— 调用父类的成员方法
super.sayHello(); // Hello from Father
// 3. super() —— 调用父类构造方法(只能在子类构造方法的第一行)
}
}
每个子类构造方法的第一行默认都有 super()(调用父类无参构造),如果不写也会自动添加。如果父类没有无参构造,子类必须手动通过 super(…) 调用父类的有参构造。
🧪 2个练手题
以下2道题目用于巩固super关键字的三种用法
题目1 — super()调用父类构造
以下代码能否编译通过?如果不能,说明原因并修正:
1 | public class Father { |
点击查看答案
编译错误!原因:父类Father定义了有参构造方法后,编译器不再自动提供无参构造。子类Son的构造方法默认第一行是 super()(调用父类无参构造),但父类没有无参构造,所以报错。
修正方案(任选其一):
- 在父类中手动添加无参构造:
1 | public Father() { } |
- 在子类构造方法中手动调用父类的有参构造:
1 | public Son() { |
关键点:每个子类构造方法的第一行默认都有super(),如果父类没有无参构造,子类必须手动用super(…)调用父类的有参构造。
题目2 — super.成员变量与super.成员方法
写出以下代码的输出结果:
1 | public class Father { |
点击查看答案
输出:
name=儿子
super.name=父亲
age=40
Hello from Son
Hello from Father
解析:
① name输出"儿子" - 就近原则,访问Son自己的name
② super.name输出"父亲" - super强制访问父类的name
③ age输出40 - Son没有定义age,自动向上到父类找到age=40
④ sayHello()输出"Hello from Son" - 调用Son重写后的方法
⑤ super.sayHello()输出"Hello from Father" - super调用父类版本
关键点:super用于在子类中访问被重写/被隐藏的父类成员。
final 关键字
1 | /* |
🧪 1个练手题
以下1道题目用于巩固final修饰类、方法、变量的规则
题目1 — final关键字综合判断
判断以下代码片段中标注的几行是否有错误(有的话请指出哪一行有问题并说明原因):
1 | final class Animal { } // ① |
点击查看答案
②、③、⑤、⑥有错误(①和④正确)。
解析:
① final class Animal - 正确。final修饰类,该类不能被继承。
② class Dog extends Animal - 错误!Animal是final类,不能被继承。
③ public final double PI - 错误!final修饰的成员变量必须在定义时初始化或在构造方法中初始化,这里没有赋初始值。
④ public final int add(int a, int b) - 正确。final修饰方法,此方法在子类中不可被重写。
⑤ public int add(int a, int b) - 错误!父类的add方法是final的,子类不能重写它。
⑥ x = 200 - 错误!final局部变量x在第3行已经被赋值为100,不能再次赋值。
修正建议:②去掉final或改为普通类。③改为 final double PI = 3.14 或加构造方法赋值。⑤重命名方法或去掉父类的final。⑥去掉x=200。
抽象类和接口
-
抽象类(abstract class)
1
2
3
4
5
6
7
8
9
10
11
12
13
14
15
16
17
18
19
20
21
22
23
24
25
26
27
28
29
30
31
32
33
34
35
36
37
38
39
40
41
42
43
44
45
46
47
48
49
50
51
52
53
54
55
56
57
58
59
60
61
62
63
64
65
66/*
* 抽象类的特点:
* 1. 使用 abstract 关键字修饰
* 2. 不能被直接实例化(不能 new)
* 3. 可以包含抽象方法、普通方法、成员变量、构造方法
* 4. 子类必须重写所有抽象方法,或者自己也声明为抽象类
*/
// 抽象类
abstract class Shape {
// 抽象方法(没有方法体,子类必须实现)
public abstract double getArea();
public abstract double getPerimeter();
}
// 子类:矩形
class Rectangle extends Shape{
private double length,width;
public Rectangle(double length, double width) {
this.length = length;
this.width = width;
}
public double getArea() {
return length*width;
}
public double getPerimeter() {
return 2*(length+width);
}
}
// 子类:圆
class Circle extends Shape{
private double radius;
public Circle(double radius) {
this.radius = radius;
}
public double getArea() {
return radius*radius*Math.PI;
}
public double getPerimeter() {
return 2*radius*Math.PI;
}
}
class ShapeDemo {
public static void main(String[] Args) {
Shape rec = new Rectangle(10,5);
System.out.println("长方形的面积为:" + rec.getArea());
System.out.println("长方形的周长为:" + rec.getPerimeter());
Shape cir = new Circle(10);
System.out.println("圆形的面积为:" + cir.getArea());
System.out.println("圆形的周长为:" + cir.getPerimeter());
}
} -
接口(interface)
1
2
3
4
5
6
7
8
9
10
11
12
13
14
15
16
17
18
19
20
21
22
23
24
25
26
27
28
29
30
31
32
33
34
35
36
37
38
39/*
* 接口的特点:
* 1. 使用 interface 关键字定义
* 2. JDK 8 之前只能有常量和抽象方法;JDK 8 后可有 default 方法和 static 方法
* 3. 类通过 implements 关键字实现接口(可以多实现)
* 4. 接口之间可以通过 extends 多继承
*/
// 接口定义
public interface Flyable {
// 常量(默认 public static final)
int MAX_SPEED = 1000;
// 抽象方法(默认 public abstract)
void fly();
// JDK 8 default 方法(有方法体,实现类可以直接使用或重写)
default void land() {
System.out.println("缓慢降落...");
}
// JDK 8 static 方法
static void check() {
System.out.println("起飞前检查...");
}
}
// 一个类可以实现多个接口
public class Bird implements Flyable, Runnable {
public void fly() {
System.out.println("鸟儿在飞翔");
}
public void run() {
System.out.println("鸟儿在地上跑");
}
} -
抽象类 vs 接口
| 区别 | 抽象类 | 接口 |
|---|---|---|
| 关键字 | abstract class | interface |
| 继承/实现 | 单继承 extends | 多实现 implements |
| 构造方法 | 有 | 无 |
| 成员变量 | 各种类型 | 仅常量(public static final) |
| 方法 | 可包含已实现的方法 | JDK8前只能抽象方法;JDK8后可default/static |
| 设计理念 | “is-a”(是什么) | “can-do”(能做什么) |
🧪 2个练手题
以下2道题目用于巩固抽象类和接口的定义与实现
题目1 — 抽象类练习
定义一个抽象类Employee,包含name属性、一个构造方法和一个抽象方法getSalary()。然后定义两个子类:
- FullTimeEmployee(全职员工):月薪固定为5000
- PartTimeEmployee(兼职员工):时薪30元,每月工作80小时
每个子类实现getSalary()方法返回工资。创建两个子类对象并输出各自的工资。
点击查看答案
参考代码:
1 | public abstract class Employee { |
输出:
张三 月薪: 5000.0
李四 月薪: 2400.0
关键点:
- 抽象类不能被new,必须通过子类实例化
- 子类必须重写所有抽象方法
- 抽象类可以有构造方法(供子类调用)
题目2 — 接口练习
定义一个接口Playable,包含一个抽象方法play()和一个default方法stop()(输出"停止播放")。定义两个实现类:
- MusicPlayer:实现play()输出"播放音乐"
- VideoPlayer:实现play()输出"播放视频",同时重写stop()输出"视频已停止"
点击查看答案
参考代码:
1 | public interface Playable { |
关键点:
- 接口中的方法默认是public abstract(可以不写)
- JDK 8的default方法有方法体,实现类可以直接使用或重写
- 一个类可以实现多个接口(Java的多实现机制)
多态
- 多态的前提
- 有继承关系或接口实现
- 子类重写父类方法
- 父类引用指向子类对象
-
多态的语法
1
2
3
4
5
6
7
8
9
10
11
12
13
14
15
16
17
18
19
20
21
22
23
24
25
26
27
28
29
30
31
32
33
34
35
36
37
38
39
40
41
42
43
44
45
46
47
48
49
50
51
52
53// 父类引用指向子类对象
public class Animal {
public void makeSound() {
System.out.println("动物发出声音...");
}
}
public class Dog extends Animal {
public void makeSound() {
System.out.println("汪汪汪!");
}
// 子类特有的方法
public void guardHouse() {
System.out.println("狗在看家...");
}
}
public class Cat extends Animal {
public void makeSound() {
System.out.println("喵喵喵!");
}
public void catchMouse() {
System.out.println("猫在抓老鼠...");
}
}
// 测试多态
public class Test {
public static void main(String[] args) {
// 多态:父类引用指向子类对象
Animal dog = new Dog(); // 编译类型是Animal,运行类型是Dog
Animal cat = new Cat(); // 编译类型是Animal,运行类型是Cat
dog.makeSound(); // 输出: 汪汪汪!(调用Dog重写后的方法)
cat.makeSound(); // 输出: 喵喵喵!(调用Cat重写后的方法)
// dog.guardHouse(); // 错误!编译类型是Animal,不能调用子类特有方法
// 多态的参数传递
feed(dog); // 输出:饲养:汪汪汪!
feed(cat); // 输出:饲养:喵喵喵!
}
// 多态的好处:只需编写一个方法处理所有Animal子类
public static void feed(Animal animal) {
System.out.print("饲养:");
animal.makeSound(); // 根据实际传入的对象类型,调用对应的重写方法
}
} -
多态中成员访问的特点
1
2
3
4
5
6
7
8
9
10
11
12
13
14
15
16
17
18
19
20
21
22
23
24
25
26
27
28
29
30
31
32
33
34
35public class Father {
int num = 10;
public void method() {
System.out.println("Father method");
}
public static void staticMethod() {
System.out.println("Father static method");
}
}
public class Son extends Father {
int num = 20;
public void method() {
System.out.println("Son method");
}
// 注意:这不是重写,是隐藏(静态方法不能被重写)
public static void staticMethod() {
System.out.println("Son static method");
}
}
public class Test {
public static void main(String[] args) {
Father f = new Son(); // 多态
System.out.println(f.num); // 输出 10(看左边,编译类型)
f.method(); // 输出 Son method(看右边,运行类型——方法重写)
f.staticMethod(); // 输出 Father static method(静态方法看左边)
}
}
口诀:成员变量看左边(编译类型),成员方法看右边(运行类型),静态方法看左边。因为只有非静态方法涉及重写!
-
多态中的转型
1
2
3
4
5
6
7
8
9
10
11
12Animal animal = new Dog();
// 向上转型(自动):子类 → 父类(多态本身就是向上转型)
Animal a = new Dog(); // Dog自动转为Animal
// 向下转型(强制):父类 → 子类
// 格式:子类类型 变量 = (子类类型) 父类引用;
Dog dog = (Dog) animal; // 强制将Animal转回Dog
dog.guardHouse(); // 现在可以调用子类特有方法了
// 错误转型会导致 ClassCastException
// Cat cat = (Cat) animal; // animal实际是Dog,强转Cat会报错!
🧪 2个练手题
以下2道题目用于巩固多态的成员访问规则和类型转换
题目1 — 多态成员访问口诀
写出以下代码的输出结果:
1 | public class Father { |
点击查看答案
输出:
10
Son method
Father static
解析——口诀:“成员变量看左边,成员方法看右边,静态方法看左边”:
① f.num = 10 —— 成员变量"看左边"(编译类型Father),访问Father的num=10。
② f.method() 输出 “Son method” —— 非静态方法"看右边"(运行类型Son),因为方法重写是动态绑定的。
③ f.staticMethod() 输出 “Father static” —— 静态方法"看左边",因为静态方法不能被重写(只能隐藏),调用时根据编译类型Father决定。
关键点:只有非静态成员方法才涉及重写和多态的动态绑定!
题目2 — 向上转型与向下转型
写出以下代码的输出结果(如果某行会报错,说明原因):
1 | class Animal { |
点击查看答案
输出:
② 狗吃骨头
④ 狗看家
解析:
① 向上转型(自动):Dog → Animal,正确
② a1.eat() - 方法重写,输出"狗吃骨头"
③ (Dog) a1 - a1实际指向的是Dog对象,转回Dog成功
④ d1.guard() - 可以调用Dog特有的guard方法,输出"狗看家"
⑤ Dog d2 = (Dog) a2 - 运行时报错 ClassCastException!因为a2实际指向的是Cat对象,不能强转为Dog。就像不能把一只猫说成是一条狗。
防范措施:在转型前使用 instanceof 判断:
if (a2 instanceof Dog) {
Dog d2 = (Dog) a2;
}
instanceof 关键字
1 | /* |
🧪 2个练手题
以下2道题目用于巩固instanceof的类型判断和安全转型
题目1 — instanceof安全转型
完善以下feed方法,使用instanceof安全地判断动物类型并调用各自特有的方法:
1 | public class Zoo { |
假设Animal/Dog/Cat类的定义同上节多态练习中的一致。
点击查看答案
参考代码:
1 | public static void feed(Animal animal) { |
调用示例:
1 | Animal dog = new Dog(); |
关键点:instanceof 用于向下转型前的安全检查,避免ClassCastException。写法模式:if (对象 instanceof 类型) { 类型 变量 = (类型) 对象; … }
题目2 — instanceof结果判断
写出以下代码的输出结果(true还是false):
1 | public class Test { |
(Animal/Dog/Cat继承关系:Dog extends Animal, Cat extends Animal)
点击查看答案
输出:
① true - dog本身就是Dog类型
② true - Dog是Animal的子类
③ true - animal实际指向的是Dog对象(运行时类型是Dog)
④ false - animal实际是Dog,不是Cat
⑤ false - obj实际是Dog,不是String
⑥ false - cat是null,null instanceof 任何类型都是false
⑦ false - null不是任何类的实例
关键点:
- instanceof 判断的是对象的实际(运行时)类型,不是引用类型
- 只要对象在继承链上能找到该类型就返回true
- null instanceof 任何类型 永远返回false
Object 类
-
toString() 方法
1
2
3
4
5
6
7
8
9
10
11
12
13
14
15
16
17
18
19
20
21
22
23
24
25
26/*
* Object 的 toString() 默认返回: "类名@哈希码"
* 通常需要重写它以返回有意义的字符串
*/
public class Student {
private String name;
private int age;
public Student(String name, int age) {
this.name = name;
this.age = age;
}
// 重写Object类的toString()方法
public String toString() {
return "Student{name='" + name + "', age=" + age + "}";
}
public static void main(String[] args) {
Student s = new Student("张三", 18);
System.out.println(s); // 默认调用 s.toString()
// 重写后输出: Student{name='张三', age=18}
// 不重写则输出: Student@15db9742(类名@哈希码)
}
} -
equals() 方法
1
2
3
4
5
6
7
8
9
10
11
12
13
14
15
16
17
18
19
20
21
22
23
24
25
26
27
28
29
30
31
32
33
34/*
* Object 的 equals() 默认比较两个对象的内存地址(等同于 ==)
* 通常需要重写它以比较对象的内容是否相等
*/
public class Student {
private String name;
private int age;
public Student(String name, int age) {
this.name = name;
this.age = age;
}
public boolean equals(Object obj) {
// 1. 判断是否为同一个对象
if (this == obj) return true;
// 2. 判断是否为null或类型不同
if (obj == null || this.getClass() != obj.getClass()) return false;
// 3. 向下转型并比较内容
Student student = (Student) obj;
return this.age == student.age && this.name.equals(student.name);
}
public static void main(String[] args) {
Student s1 = new Student("张三", 18);
Student s2 = new Student("张三", 18);
Student s3 = new Student("李四", 20);
System.out.println(s1 == s2); // false(比较地址,两个不同对象)
System.out.println(s1.equals(s2)); // true (重写后,比较内容)
System.out.println(s1.equals(s3)); // false
}
} -
hashCode() 方法
重写 equals() 时必须同时重写 hashCode(),保证两个相等的对象有相同的哈希值
1 |
|
🧪 2个练手题
以下2道题目用于巩固Object类的toString()和equals()方法重写
题目1 — toString()重写
定义一个Phone类,包含brand(品牌)和price(价格)两个属性,重写toString()方法输出格式如"Phone{brand=‘华为’, price=4999.0}"。创建两个Phone对象,分别用System.out.println打印,观察重写前后的区别。
点击查看答案
参考代码:
1 | public class Phone { |
输出:
Phone{brand=‘华为’, price=4999.0}
Phone{brand=‘小米’, price=2999.0}
如果不重写toString(),输出会是类似 Phone@15db9742 这样的内存地址表示(类名@哈希码),没有可读性。重写toString()后打印对象会更友好。
题目2 — equals()重写
以下代码为何输出false?请重写equals()方法使s1.equals(s2)返回true:
1 | public class Student { |
点击查看答案
s1.equals(s2) 返回false是因为Object默认的equals()比较的是内存地址(等同于==),两个不同对象地址必然不同。
重写equals():
1 | @Override |
重写后 s1.equals(s2) 返回true。
关键点:String的equals()已经重写好了(比较内容),所以我们直接调用name.equals(other.name)。另外重写equals()后建议同时重写hashCode():
1 | @Override |
内部类
-
成员内部类
1
2
3
4
5
6
7
8
9
10
11
12
13
14
15public class Outer {
private String name = "外部类";
// 成员内部类(像成员变量一样定义在类中)
public class Inner {
public void show() {
System.out.println("访问外部类的成员: " + name); // 可直接访问
}
}
}
// 使用成员内部类
Outer outer = new Outer();
Outer.Inner inner = outer.new Inner(); // 通过外部类对象创建
inner.show(); // 输出: 访问外部类的成员: 外部类 -
静态内部类
1
2
3
4
5
6
7
8
9
10
11
12
13
14public class Outer {
static String msg = "静态成员";
// 静态内部类(用static修饰)
static class StaticInner {
public void show() {
System.out.println("访问静态成员: " + msg); // 只能访问静态成员
}
}
}
// 使用静态内部类(不需要外部类对象)
Outer.StaticInner inner = new Outer.StaticInner();
inner.show(); -
局部内部类
1
2
3
4
5
6
7
8
9
10
11
12public class Outer {
public void method() {
// 局部内部类:定义在方法内部
class LocalInner {
public void show() {
System.out.println("局部内部类执行");
}
}
LocalInner local = new LocalInner();
local.show();
}
} -
匿名内部类(重点)
匿名内部类是使用频率最高的一种内部类。本质是一个没有名字的局部内部类,通常用于简化接口或抽象类的实现1
2
3
4
5
6
7
8
9
10
11
12
13
14
15
16
17
18
19
20
21
22
23
24
25
26
27
28
29
30
31/*
* 格式:new 父类/接口() {
* // 实现或重写方法
* };
*/
// 场景1:通过匿名内部类实现接口
public interface Greeting {
void greet();
}
public class Test {
public static void main(String[] args) {
// 用匿名内部类(一步到位,无需单独定义实现类)
Greeting g = new Greeting() {
public void greet() {
System.out.println("Hello from 匿名内部类!");
}
};
g.greet(); // 输出: Hello from 匿名内部类!
// 场景2:匿名内部类作为参数传递
new Thread(new Runnable() {
public void run() {
System.out.println("线程运行中...");
}
}).start();
}
}
| 内部类类型 | 定义位置 | 能否有static成员 | 访问外部类权限 | 实例化条件 |
|---|---|---|---|---|
| 成员内部类 | 成员位置 | 否 | 所有成员 | 依赖外部类对象 |
| 静态内部类 | 成员位置(带static) | 是 | 仅静态成员 | 独立创建 |
| 局部内部类 | 方法/代码块内部 | 否 | 所有成员 | 依赖方法调用 |
| 匿名内部类 | 方法内部/参数中 | 否 | 所有成员 | 随定义立即实例化 |
🧪 2个练手题
以下2道题目用于巩固成员内部类的使用和匿名内部类
题目1 — 成员内部类
定义一个Outer类,内部有一个成员内部类Inner。Outer有一个name属性,Inner有一个show()方法用来打印Outer的name。在main方法中创建Inner对象并调用show()。
点击查看答案
参考代码:
1 | public class Outer { |
输出:
访问外部类的name: 外部类
关键点:
- 成员内部类可以直接访问外部类的私有成员
- 创建成员内部类对象需要先有外部类对象:outer.new Inner()
- 在外部类外部引用内部类的类型:Outer.Inner
题目2 — 匿名内部类
使用匿名内部类创建一个Runnable对象并启动线程(输出"匿名内部类在线程中运行")。要求:不使用Lambda表达式,只用传统的匿名内部类写法。
点击查看答案
参考代码:
1 | public class Test { |
输出:
匿名内部类在线程中运行
格式:new 接口名/父类名() { 重写方法 };
本质:创建了一个没有名字的类,该类实现了接口或继承了父类,并当场创建了该类的对象。
异常
-
异常体系结构
1
2
3
4
5Throwable
├── Error(严重错误,不处理;如OutOfMemoryError)
└── Exception(可处理的异常)
├── RuntimeException(运行时异常,可不处理;如NullPointerException)
└── 其他Exception(编译时异常,必须处理;如IOException) -
try-catch-finally
try 负责监控和执行容易出错的代码,用try把想运行但可能出问题的代码包起来
catch 负责处理错误,如果try顺利执行,catch则跳过;如果try报错,则立刻跳转到catch
finally 负责善后和清理,无论try报错与否,finally里的代码最后永远会执行,通常用来释放内存
想象处理异常的过程是再厨房做菜,try就是尝试去点火炒菜,catch就是如果不小心烧焦了(报错),就启动灭火器去补救,finally就是无论菜炒的好不好,饭后都得刷锅洗碗。1
2
3
4
5
6
7
8
9
10
11
12
13
14
15
16public class ExceptionDemo {
public static void main(String[] args) {
// try-catch 处理异常
try {
int[] arr = {1, 2, 3};
System.out.println(arr[5]); // 数组越界,抛出异常
} catch (ArrayIndexOutOfBoundsException e) {
System.out.println("捕获到异常: " + e.getMessage());
e.printStackTrace(); // 打印异常堆栈信息
} finally {
// 无论是否发生异常都会执行(释放资源的理想位置)
System.out.println("finally块:资源释放");
}
System.out.println("程序继续执行..."); // 异常被捕获后程序可继续
}
} -
多重catch与异常处理规则
捕获了异常之后(菜烧焦的话),要么灭火,要么去点外卖,多种处理方式。1
2
3
4
5
6
7
8
9
10
11
12
13
14
15
16
17
18
19try {
String str = null;
// System.out.println(str.length()); // NullPointerException
int result = 10 / 0; // ArithmeticException
int[] arr = new int[3];
arr[5] = 10; // ArrayIndexOutOfBoundsException
} catch (ArithmeticException e) {
System.out.println("算术异常: " + e.getMessage());
} catch (NullPointerException e) {
System.out.println("空指针异常: " + e.getMessage());
} catch (Exception e) {
// 父类异常必须放在最后,否则编译错误
System.out.println("其他异常: " + e.getMessage());
} finally {
System.out.println("finally始终执行");
} -
throws 和 throw
1
2
3
4
5
6
7
8
9
10
11
12
13
14
15
16// throws:声明方法可能抛出的异常(交给调用者处理)
public static int divide(int a, int b) throws Exception {
if (b == 0) {
// throw:手动抛出异常
throw new Exception("除数不能为零!");
}
return a / b;
}
public static void main(String[] args) {
try {
int result = divide(10, 0);
} catch (Exception e) {
System.out.println(e.getMessage()); // 除数不能为零!
}
}
| 特性 | throw | throws |
|---|---|---|
| 位置 | 方法体内部 | 方法签名 |
| 后接内容 | 具体的异常对象实例 | 异常的类名 |
| 数量 | 只能抛出一个异常实例 | 可以同时声明抛出多个异常类型,用逗号隔开 |
| 主动性 | 执行时一定会抛出异常 | 仅声明可能发生异常,不一定会实际抛出 |
-
自定义异常
1
2
3
4
5
6
7
8
9
10
11
12
13
14
15
16
17
18// 自定义异常:继承 Exception(编译时异常)或 RuntimeException(运行时异常)
public class AgeException extends Exception {
public AgeException() {
super();
}
public AgeException(String message) {
super(message); // 将异常信息传递给父类
}
}
// 使用自定义异常
public static void checkAge(int age) throws AgeException {
if (age < 0 || age > 150) {
throw new AgeException("年龄不合法: " + age);
}
System.out.println("年龄正常");
}
🧪 3个练手题
以下3道题目用于巩固异常处理机制:try-catch-finally、throws/throw和自定义异常
题目1 — try-catch-finally执行流程
写出以下代码的输出结果:
1 | public class ExceptionFlow { |
点击查看答案
输出:
A
C
D
结果: 2
执行流程:
- 输出A
- int r = 10 / 0 抛出 ArithmeticException,try块中后面的代码(输出B和return 1)被跳过
- catch捕获异常,输出C,准备return 2
- 在return之前,finally块执行,输出D
- 然后才执行return,返回2
- main方法打印"结果: 2"
关键点:
- try中某行抛异常后,该行后面的try代码都不执行
- catch捕获匹配的异常后执行
- finally无论是否异常都会执行(即使catch中有return)
- 执行顺序:try → 遇异常 → catch → finally → return
题目2 — throws和throw的使用
定义一个divide方法,接收两个int参数。当除数为0时,使用throw手动抛出IllegalArgumentException异常(携带信息"除数不能为0")。在main方法中使用try-catch调用divide并处理可能抛出的异常。
点击查看答案
参考代码:
1 | public class Calculator { |
输出:
异常信息: 除数不能为0
程序继续运行…
关键区分:
- throws:方法声明时使用,告诉调用者"我可能抛出这些异常,你得处理"
- throw:方法体内使用,手动创建一个异常对象并抛出
- IllegalArgumentException是RuntimeException的子类,调用方可以不强制处理
题目3 — 自定义异常
自定义一个ScoreException异常类(继承Exception),包含一个带参构造方法接收错误信息。然后定义一个checkScore方法,接收一个int分数,如果分数小于0或大于100,抛出自定义的ScoreException。在main中测试:先传一个合法分数,再传一个非法分数。
点击查看答案
参考代码:
1 | // 自定义异常 |
输出:
分数合法: 85
分数不合法: 150,应在0~100之间
检查完毕
关键点:
- 自定义异常继承Exception(编译时异常,必须处理)或RuntimeException(运行时异常,可选处理)
- super(message) 将异常信息传递给父类
- 自定义异常让业务语义更清晰
字符串类
-
String 的基本使用
1
2
3
4
5
6
7
8
9
10
11
12
13
14// 创建字符串的几种方式
String s1 = "Hello"; // 字面量方式(存放在字符串常量池)
String s2 = new String("Hello"); // new方式(在堆中创建新对象)
String s3 = new String(new char[]{'H','e','l','l','o'}); // 通过字符数组
// 字符串常量池:字面量创建的字符串会放入常量池,相同字面量共享同一个对象
String a = "Java";
String b = "Java";
System.out.println(a == b); // true(指向常量池同一对象)
String c = new String("Java");
System.out.println(a == c); // false(c在堆中)
System.out.println(a.equals(c)); // true(equals比较内容) -
String 常用方法
1
2
3
4
5
6
7
8
9
10
11
12
13
14
15
16
17
18
19
20
21
22
23
24
25
26
27
28
29
30
31
32
33
34
35
36
37String str = " Hello Java World ";
// 获取
System.out.println(str.length()); // 20(字符串长度,含空格)
System.out.println(str.charAt(0)); // ' '(获取指定索引的字符)
System.out.println(str.indexOf("Java")); // 8(查找子串的索引)
System.out.println(str.substring(8)); // Java World (从索引8开始截取)
System.out.println(str.substring(8, 12)); // Java(截取[8,12))
// 判断
System.out.println(str.contains("llo")); // true
System.out.println(str.startsWith(" ")); // true
System.out.println(str.endsWith(" ")); // true
System.out.println(str.isEmpty()); // false
System.out.println("java".equals("Java")); // false
System.out.println("java".equalsIgnoreCase("Java"));// true(忽略大小写)
// 转换
System.out.println(str.trim()); // 去除前后空白 → "Hello Java World"
System.out.println(str.toUpperCase()); // " HELLO JAVA WORLD "
System.out.println(str.toLowerCase()); // " hello java world "
System.out.println(str.replace("Java", "World"));// " Hello World World "
// 分割与拼接
String data = "apple,banana,orange";
String[] fruits = data.split(","); // 按逗号分割成数组
for (String f : fruits) {
System.out.println(f); // apple banana orange
}
// String.join()拼接
String joined = String.join("-", fruits);
System.out.println(joined); // apple-banana-orange
// String.valueOf()其他类型转字符串
int num = 100;
String numStr = String.valueOf(num); // "100" -
StringBuilder / StringBuffer
String 是不可变的,频繁拼接会产生大量临时对象。StringBuilder(线程不安全、性能好)和 StringBuffer(线程安全)用于解决此问题
1 | // StringBuilder 高效拼接(推荐,除非多线程场景) |
🧪 3个练手题
以下3道题目用于巩固String常用方法和StringBuilder的使用
题目1 — 字符串方法综合运用
给定字符串 str = " Hello World Java ",编写代码依次完成以下操作并输出每一步结果:
- 去除字符串前后空白
- 获取字符串长度
- 找到"World"的起始索引
- 截取出"World"这个子串
- 将"Java"替换为"Python"
- 全部转为小写
点击查看答案
参考代码:
1 | String str = " Hello World Java "; |
输出:
- 去空白: [Hello World Java]
- 长度: 16
- World索引: 6
- 截取World: World
- 替换后: Hello World Python
- 小写: hello world python
注意:String是不可变的,trim()、replace()、toLowerCase() 都返回一个新字符串,原字符串不变。
题目2 — 字符串分割与拼接
给定字符串 data = "苹果,香蕉,橘子,西瓜,葡萄",按逗号分割成数组,然后使用 - 号把所有水果名拼接起来输出。
点击查看答案
参考代码:
1 | String data = "苹果,香蕉,橘子,西瓜,葡萄"; |
输出:
分割结果:
苹果
香蕉
橘子
西瓜
葡萄
拼接结果: 苹果-香蕉-橘子-西瓜-葡萄
题目3 — StringBuilder高效拼接
使用StringBuilder构建一个字符串,内容为 “第1名: 张三, 第2名: 李四, 第3名: 王五”。然后尝试在第2名和第3名之间插入 "第2.5名: 赵六, ",最后输出结果。
点击查看答案
参考代码:
1 | StringBuilder sb = new StringBuilder(); |
输出:
原始: 第1名: 张三, 第2名: 李四, 第3名: 王五
插入后: 第1名: 张三, 第2名: 李四, 第2.5名: 赵六, 第3名: 王五
String vs StringBuilder:
- String使用 + 拼接每次都会创建新对象,循环中频繁拼接效率低
- StringBuilder是可变的,不会产生多余对象,适合频繁拼接的场景
System 类
1 | import java.util.Arrays; |
🧪 1个练手题
以下1道题目用于巩固System类的常用方法
题目1 — System.arraycopy和currentTimeMillis
使用System.arraycopy将一个数组的前3个元素复制到另一个空数组的前3个位置。再使用System.currentTimeMillis计算一个循环(如累加1到1000000)的耗时(毫秒)。
点击查看答案
参考代码:
1 | import java.util.Arrays; |
输出(耗时根据机器性能不同):
复制后: [10, 20, 30, 0, 0]
累加结果: 500000500000
耗时: 3 ms
关键点:
- arraycopy是native方法,比手动循环复制高效
- currentTimeMillis返回自1970-01-01 00:00:00 UTC以来的毫秒数
Runtime 类
1 | import java.io.IOException; |
🧪 1个练手题
以下1道题目用于巩固Runtime类获取JVM信息的方法
题目1 — 获取JVM内存信息
使用Runtime类获取JVM的:最大内存、已分配内存、空闲内存,并计算已使用内存。所有结果以MB为单位显示。
点击查看答案
参考代码:
1 | public class MemoryInfo { |
示例输出(因机器而异):
最大内存: 3616 MB
已分配内存: 245 MB
空闲内存: 240 MB
已使用内存: 5 MB
可用处理器: 8 核
关系:已使用内存 = 已分配内存 - 空闲内存。maxMemory是JVM能从操作系统获取的最大内存。
Math 类
1 | public class MathDemo { |
🧪 1个练手题
以下1道题目用于巩固Math类的常用数学方法
题目1 — Math工具方法综合
不用if-else或三元运算符,仅使用Math类的max/min方法,求三个int数 (a=15, b=42, c=8) 中的最大值和最小值。
再使用Math的pow和sqrt方法计算:3的4次方是多少?16的平方根是多少?
最后使用Math.random()生成一个10~20之间(含10和20)的随机整数。
点击查看答案
参考代码:
1 | int a = 15, b = 42, c = 8; |
输出:
最大值: 42
最小值: 8
3的4次方: 81.0
16的平方根: 4.0
10~20随机数: (随机)
公式:(int)(Math.random() * N) + min
其中 N = max - min + 1 = 20 - 10 + 1 = 11
注意:Math.round(-3.5) 的结果是 -3,这是面试常考的坑!round内部是 floor(x + 0.5)。
Random 类
1 | import java.util.Random; |
🧪 1个练手题
以下1道题目用于巩固Random类生成指定范围随机数的方法
题目1 — 生成随机密码
使用Random类编写一个方法,生成一个6位的随机验证码,由大写字母(A-Z)和数字(0-9)混合组成。运行三次看结果是否不同。
点击查看答案
参考代码:
1 | import java.util.Random; |
示例输出(随机):
验证码1: A7X9K2
验证码2: Y3BQ0M
验证码3: 8ZP5FN
公式总结:
[0, n) : r.nextInt(n)
[min, max] 包含两端 : r.nextInt(max - min + 1) + min
注意Random对象如果传入了相同的种子值(seed),生成的随机数序列完全相同。
时间日期类
-
Date 类(JDK 1.0,大部分方法已过时)
1
2
3
4
5
6
7
8
9
10
11
12
13
14
15
16
17
18
19
20
21
22import java.util.Date;
import java.text.SimpleDateFormat;
public class DateDemo {
public static void main(String[] args) {
// 创建当前时间的Date对象
Date now = new Date();
System.out.println("当前时间: " + now);
// 输出: Tue Jun 09 15:30:00 CST 2026
// 获取毫秒值(从1970-01-01 00:00:00 GMT开始)
long time = now.getTime();
System.out.println("毫秒值: " + time);
// 通过毫秒值创建Date
Date date2 = new Date(time + 86400000L); // +1天的毫秒数
// 判断时间先后
System.out.println(now.before(date2)); // true
System.out.println(now.after(date2)); // false
}
} -
SimpleDateFormat 格式化日期
1
2
3
4
5
6
7
8
9
10
11
12
13
14
15
16
17
18
19
20import java.text.SimpleDateFormat;
import java.util.Date;
public class DateFormatDemo {
public static void main(String[] args) throws Exception {
Date now = new Date();
// 日期 → 字符串(格式化)
SimpleDateFormat sdf1 = new SimpleDateFormat("yyyy-MM-dd HH:mm:ss");
System.out.println(sdf1.format(now)); // 2026-06-09 15:30:00
SimpleDateFormat sdf2 = new SimpleDateFormat("yyyy年MM月dd日 E HH:mm:ss.SSS");
System.out.println(sdf2.format(now)); // 2026年06月09日 星期二 15:30:00.123
// 字符串 → 日期(解析)
String dateStr = "2026-06-09 12:00:00";
Date parsed = sdf1.parse(dateStr);
System.out.println(parsed);
}
} -
JDK 8 时间API(java.time 包)
1
2
3
4
5
6
7
8
9
10
11
12
13
14
15
16
17
18
19
20
21
22
23
24
25
26
27
28
29
30
31
32
33
34
35
36
37
38
39
40
41
42
43
44
45
46
47import java.time.*;
import java.time.format.DateTimeFormatter;
import java.time.temporal.ChronoUnit;
public class JavaTimeDemo {
public static void main(String[] args) {
// LocalDate:日期(年、月、日)
LocalDate today = LocalDate.now();
System.out.println("今天: " + today); // 2026-06-09
System.out.println("年: " + today.getYear());
System.out.println("月: " + today.getMonthValue());
System.out.println("日: " + today.getDayOfMonth());
System.out.println("星期: " + today.getDayOfWeek());
LocalDate birthday = LocalDate.of(2000, 1, 1); // 指定日期
System.out.println("指定日期: " + birthday);
// LocalTime:时间(时、分、秒、纳秒)
LocalTime now = LocalTime.now();
System.out.println("当前时间: " + now); // 15:30:00.123456789
// LocalDateTime:日期+时间
LocalDateTime dateTime = LocalDateTime.now();
System.out.println("日期时间: " + dateTime);
// 日期时间的加减
LocalDateTime nextWeek = dateTime.plusWeeks(1);
LocalDateTime lastMonth = dateTime.minusMonths(1);
System.out.println("一周后: " + nextWeek);
System.out.println("一个月前: " + lastMonth);
// 日期时间格式化(JDK 8)
DateTimeFormatter dtf = DateTimeFormatter.ofPattern("yyyy-MM-dd HH:mm:ss");
System.out.println("格式化: " + dateTime.format(dtf));
// 时间间隔计算
LocalDate d1 = LocalDate.of(2026, 1, 1);
LocalDate d2 = LocalDate.of(2026, 6, 9);
Period period = Period.between(d1, d2);
System.out.println("相差: " + period.getMonths() + "个月 " + period.getDays() + "天");
System.out.println("相差总天数: " + ChronoUnit.DAYS.between(d1, d2));
// 判断
System.out.println(d1.isBefore(d2)); // true
System.out.println(d1.isLeapYear()); // false(2026不是闰年)
}
}
推荐使用 JDK 8 的 java.time API,它线程安全、API设计合理,是替代旧版 Date/Calendar 的首选。
🧪 2个练手题
以下2道题目用于巩固java.time包的日期时间操作
题目1 — 日期计算与格式化
使用JDK 8的java.time API完成以下操作:
- 获取今天的日期并格式化输出为"yyyy年MM月dd日"
- 计算今天到今年结束(12月31日)还有多少天
- 计算10天后的日期是哪一天
点击查看答案
参考代码:
1 | import java.time.LocalDate; |
示例输出(假设今天是2026-06-10):
今天: 2026年06月10日
距年底还有: 204 天
10天后: 2026年06月20日
关键点:java.time的类都是不可变的,plusDays返回新对象,原对象不变。
题目2 — 判断闰年与计算年龄
编写代码:输入一个年份(如2000),判断是否为闰年。然后计算从2000年1月1日出生的人到今天为止的年龄(精确到年)。
点击查看答案
参考代码:
1 | import java.time.LocalDate; |
示例输出:
2000年是闰年
年龄: 26岁5个月9天
闰年规则(来自LocalDate.isLeapYear()内部实现):
- 能被400整除的是闰年
- 能被4整除但不能被100整除的是闰年
- 其他不是闰年
包装类
- 基本类型与包装类的对应关系
| 基本类型 | 包装类 |
|---|---|
| byte | Byte |
| short | Short |
| int | Integer |
| long | Long |
| float | Float |
| double | Double |
| char | Character |
| boolean | Boolean |
-
装箱与拆箱
1
2
3
4
5
6
7
8
9
10
11
12
13
14
15
16
17
18
19
20
21
22
23public class WrapperDemo {
public static void main(String[] args) {
// 手动装箱:基本类型 → 包装类对象
Integer i1 = Integer.valueOf(100);
Double d1 = Double.valueOf(3.14);
// 手动拆箱:包装类对象 → 基本类型
int i2 = i1.intValue();
double d2 = d1.doubleValue();
// 自动装箱(JDK 5+)
Integer i3 = 200; // 编译器自动转为 Integer.valueOf(200)
// 自动拆箱(JDK 5+)
int i4 = i3; // 编译器自动转为 i3.intValue()
// 自动装箱拆箱在运算和集合中的使用
Integer a = 10;
Integer b = 20;
Integer c = a + b; // 自动拆箱 → 运算 → 自动装箱
System.out.println(c); // 30
}
} -
包装类的常用方法
1
2
3
4
5
6
7
8
9
10
11
12
13
14
15
16
17
18
19
20
21
22
23
24
25
26// Integer 常用方法
// 字符串 → 基本类型(解析)
int num = Integer.parseInt("123"); // "123" → 123
double d = Double.parseDouble("3.14"); // "3.14" → 3.14
boolean flag = Boolean.parseBoolean("true"); // "true" → true
// 基本类型 → 字符串
String s1 = Integer.toString(100); // 100 → "100"
String s2 = Double.toString(3.14); // 3.14 → "3.14"
String s3 = String.valueOf(100); // 100 → "100"(更通用)
// 进制转换
System.out.println(Integer.toBinaryString(10)); // "1010" (10转2进制)
System.out.println(Integer.toOctalString(10)); // "12" (10转8进制)
System.out.println(Integer.toHexString(255)); // "ff" (255转16进制)
// 常量
System.out.println(Integer.MAX_VALUE); // 2147483647
System.out.println(Integer.MIN_VALUE); // -2147483648
System.out.println(Integer.BYTES); // 4(字节数)
// 比较
Integer x = 10, y = 20;
System.out.println(Integer.compare(x, y)); // -1(x < y)
System.out.println(Integer.max(x, y)); // 20
System.out.println(Integer.min(x, y)); // 10 -
Integer 缓存机制(面试高频)
1
2
3
4
5
6
7
8
9
10
11
12
13/*
* Integer 内部维护了 -128 ~ 127 的缓存数组
* 自动装箱时,如果值在此范围内,会直接返回缓存中的对象(不会new新对象)
*/
Integer a = 127;
Integer b = 127;
System.out.println(a == b); // true(来自缓存,是同一个对象)
Integer c = 128;
Integer d = 128;
System.out.println(c == d); // false(超出缓存范围,创建了两个新对象)
System.out.println(c.equals(d)); // true(equals比较的是值)
关键结论:包装类对象之间的比较,始终使用 equals() 方法,不要使用 == !
🧪 2个练手题
以下2道题目用于巩固包装类的装箱拆箱和Integer缓存机制
题目1 — 装箱拆箱与字符串转换
完成以下操作:
- 将字符串"12345"解析为int类型
- 将字符串"3.1415"解析为double类型
- 将int值255转换为16进制字符串
- 使用自动装箱将基本类型赋值给包装类,再自动拆箱参与运算
点击查看答案
参考代码:
1 | // 1. 字符串 -> int |
输出:
解析int: 12345
解析double: 3.1415
255转16进制: ff
a + b = 300
题目2 — Integer缓存陷阱(面试高频)
写出以下代码的输出结果,并解释原因:
1 | Integer a = 100; |
点击查看答案
输出:
① true
② false
③ false
④ true
解析:
① a == b 返回true —— Integer内部维护了-128~127的缓存数组。100在缓存范围内,自动装箱时直接返回缓存中的同一个对象,所以a和b指向同一块内存。
② c == d 返回false —— 200超出了缓存范围(-128~127),自动装箱时会创建新的Integer对象,c和d是两个不同的对象。
③ e == f 返回false —— new Integer() 强制在堆上创建新对象,不走缓存,100%创建两个不同对象。
④ c.equals(d) 返回true —— equals()比较的是包装类的值,不是地址。
核心结论:包装类对象之间比较,永远使用equals(),不要使用==!
正则表达式
- 正则表达式语法
| 字符 | 说明 | 示例 |
|---|---|---|
| . | 匹配任意单个字符 | a.c 匹配 abc、a1c |
| \d | 匹配数字 [0-9] | \d+ 匹配 123 |
| \w | 匹配字母/数字/下划线 | \w+ 匹配 hello_world |
| \s | 匹配空白字符 | \s 匹配空格/制表符 |
| * | 0次或多次 | a* 匹配 “”、“a”、“aaa” |
| + | 1次或多次 | a+ 匹配 “a”、“aaa” |
| ? | 0次或1次 | a? 匹配 “”、“a” |
| {n} | 正好n次 | \d{3} 匹配 123 |
| {n,} | 至少n次 | \d{2,} 匹配 12、12345 |
| {n,m} | n到m次 | \d{2,4} 匹配 12、123、1234 |
| ^ | 字符串开头 | ^Hello |
| $ | 字符串结尾 | World$ |
| [abc] | 匹配a或b或c | [abc] 匹配 a、b、c |
| [^abc] | 匹配不是a,b,c | [^0-9] 匹配非数字 |
| | | 或 | java|python |
| () | 分组捕获 | (ab)+ 匹配 ab、abab |
-
Java中使用正则
1
2
3
4
5
6
7
8
9
10
11
12
13
14
15
16
17
18
19
20
21
22
23
24
25
26
27
28
29
30
31
32
33
34
35
36import java.util.regex.Pattern;
import java.util.regex.Matcher;
public class RegexDemo {
public static void main(String[] args) {
// 方式1:String.matches() —— 简单验证
String phone = "13812345678";
boolean isPhone = phone.matches("1[3-9]\\d{9}");
System.out.println("手机号格式: " + isPhone); // true
// 常见验证正则
// 邮箱:\w+@\w+\.\w+
// 身份证:\d{17}[\dXx]
// QQ号:[1-9]\d{4,10}
// 方式2:Pattern + Matcher —— 复杂查找与提取
String text = "我的手机号是13812345678,邮箱是abc@qq.com,邮编是100000";
Pattern pattern = Pattern.compile("1[3-9]\\d{9}");
Matcher matcher = pattern.matcher(text);
// find():查找下一个匹配的子串
while (matcher.find()) {
System.out.println("找到: " + matcher.group()); // 13812345678
}
// 分组提取
Pattern p2 = Pattern.compile("(\\w+)@(\\w+\\.\\w+)");
Matcher m2 = p2.matcher(text);
if (m2.find()) {
System.out.println("完整匹配: " + m2.group(0)); // abc@qq.com
System.out.println("用户名: " + m2.group(1)); // abc
System.out.println("域名: " + m2.group(2)); // qq.com
}
}
} -
String 中与正则相关的方法
1
2
3
4
5
6
7
8
9
10
11
12
13
14String str = "apple, banana, orange , grape";
// split() 按正则分割
String[] fruits = str.split(",\\s*"); // 逗号+可选空白
// 结果: ["apple", "banana", "orange", "grape"]
// replaceAll() 按正则替换全部
String cleaned = str.replaceAll("\\s+", " "); // 多个空白合并为一个
// replaceFirst() 只替换第一个匹配
String result = str.replaceFirst("[aeiou]", "*"); // 替换第一个元音
// matches() 整串匹配
boolean b = "12345".matches("\\d{5}"); // true
🧪 2个练手题
以下2道题目用于巩固正则表达式的常见场景:格式验证和文本提取
题目1 — 手机号和邮箱验证
使用String.matches()方法验证以下字符串:
- “13812345678” 是否为合法的中国手机号?(规则:1开头,第二位3-9,共11位数字)
- “hello@world.com” 是否为合法的邮箱格式?(简化规则:字母数字@字母数字.字母)
点击查看答案
参考代码:
1 | String phone = "13812345678"; |
输出:
手机号格式: true
邮箱格式: true
false
true
正则说明:
- 1[3-9]\d{9} : 1开头 + 3-9中选一个 + 9个数字
- \w+@\w+\.\w+ : 多个字母数字 + @ + 多个字母数字 + . + 多个字母
- 注意Java字符串中\d要写双斜杠,因为\本身需要转义
题目2 — 提取文本中的数字
给定文本 "订单号: 2024001, 金额: 99.50元, 数量: 3件, 快递号: 7733224411",使用Pattern和Matcher提取出文本中所有的连续数字(不含小数点)。输出应为:[2024001, 99, 50, 3, 7733224411]
点击查看答案
参考代码:
1 | import java.util.regex.Pattern; |
输出:
[2024001, 99, 50, 3, 7733224411]
关键点:
- \d+ 匹配一个或多个连续数字
- matcher.find() 每次找到下一个匹配
- matcher.group() 获取当前匹配到的文本
- 如果只提取一次,可以用字符串的replaceAll(“\D+”, “”)去除所有非数字字符
集合
集合框架核心接口:
1 | Collection(单列集合) |
集合选择指南
| 数据结构特征 | 推荐集合 | 理由 |
|---|---|---|
| 单列 + 有序 + 索引访问 | ArrayList |
底层数组支持 O(1) 随机索引访问 |
| 单列 + 去重 + 无需顺序 | HashSet |
哈希表,contains() 为 O(1) |
| 单列 + 去重 + 自动排序 | TreeSet |
红黑树,元素按自然/比较器顺序排列 |
| 双列 + 键值对查询 | HashMap |
哈希表,get() 为 O(1) |
| 双列 + 键值对 + 排序 | TreeMap |
红黑树,key 自动排序 |
| 头尾操作多 | LinkedList |
双向链表,头尾增删 O(1) |
选择口诀:单列有序索引→ArrayList,单列去重无序→HashSet,单列去重排序→TreeSet,双列键值对→HashMap,双列键值对排序→TreeMap,头尾操作多→LinkedList。
Collection 接口
1 | import java.util.ArrayList; |
🧪 1个练手题
以下1道题目用于巩固Collection接口的通用操作方法
题目1 — Collection通用操作
创建一个ArrayList
- 添加"Java", “Python”, “C++”
- 输出集合大小和是否包含"Python"
- 删除"C++"
- 创建另一个集合c2(含"Go", “Rust”),批量添加到原集合
- 输出最终集合的内容
点击查看答案
参考代码:
1 | import java.util.ArrayList; |
输出:
添加后: [Java, Python, C++]
大小: 3
包含Python? true
删除C++后: [Java, Python]
批量添加后: [Java, Python, Go, Rust]
是否为空? false
关键点:这些方法(add/remove/contains/size/isEmpty/addAll)是Collection接口定义的通用方法,所有Collection子类(List/Set)都适用。
List 接口
-
ArrayList 集合
1
2
3
4
5
6
7
8
9
10
11
12
13
14
15
16
17
18
19
20
21
22
23
24
25
26
27
28
29
30
31
32
33
34
35
36import java.util.ArrayList;
import java.util.List;
public class ArrayListDemo {
public static void main(String[] args) {
List<String> list = new ArrayList<>();
// 添加元素
list.add("张三");
list.add("李四");
list.add("王五");
list.add(1, "赵六"); // 在索引1位置插入(后面的元素后移)
System.out.println(list); // [张三, 赵六, 李四, 王五]
// 获取元素
System.out.println(list.get(0)); // 张三
// 删除元素
list.remove(0); // 按索引删除
list.remove("李四"); // 按元素删除
// 修改元素
list.set(0, "张三丰"); // 将索引0的元素替换
// 遍历方式
// 1. for循环(有索引)
for (int i = 0; i < list.size(); i++) {
System.out.println(list.get(i));
}
// 2. 增强for循环
for (String name : list) {
System.out.println(name);
}
}
} -
LinkedList 集合
1
2
3
4
5
6
7
8
9
10
11
12
13
14
15
16
17
18
19
20
21
22
23
24
25
26
27
28
29
30
31
32
33
34
35
36import java.util.LinkedList;
public class LinkedListDemo {
public static void main(String[] args) {
LinkedList<String> list = new LinkedList<>();
list.add("A");
list.add("B");
list.add("C");
// 头尾操作(LinkedList特有)
list.addFirst("Head"); // 在头部添加
list.addLast("Tail"); // 在尾部添加
System.out.println(list); // [Head, A, B, C, Tail]
System.out.println(list.getFirst()); // Head(获取头部)
System.out.println(list.getLast()); // Tail(获取尾部)
list.removeFirst(); // 删除头部
list.removeLast(); // 删除尾部
System.out.println(list); // [A, B, C]
// 栈操作(push/pop)
LinkedList<String> stack = new LinkedList<>();
stack.push("入栈1"); // 压栈(在头部添加)
stack.push("入栈2");
stack.push("入栈3");
System.out.println(stack.pop()); // 出栈(取出头部):入栈3
// 队列操作(offer/poll)
LinkedList<String> queue = new LinkedList<>();
queue.offer("任务1"); // 入队(在尾部添加)
queue.offer("任务2");
System.out.println(queue.poll()); // 出队(取出头部):任务1
}
} -
Iterator 接口
1
2
3
4
5
6
7
8
9
10
11
12
13
14
15
16
17
18
19
20
21
22
23
24
25
26
27import java.util.ArrayList;
import java.util.Iterator;
import java.util.List;
public class IteratorDemo {
public static void main(String[] args) {
List<String> list = new ArrayList<>();
list.add("Java");
list.add("Python");
list.add("C++");
// 获取迭代器
Iterator<String> it = list.iterator();
// 迭代遍历
while (it.hasNext()) { // 判断是否有下一个元素
String s = it.next(); // 获取下一个元素
System.out.println(s);
// 安全删除(不能使用 list.remove(),会抛ConcurrentModificationException)
if (s.equals("Python")) {
it.remove(); // 使用迭代器的remove方法
}
}
System.out.println("删除后: " + list); // [Java, C++]
}
} -
foreach 循环
1
2
3
4
5
6
7
8
9
10
11
12
13
14
15List<Integer> numbers = new ArrayList<>();
numbers.add(10);
numbers.add(20);
numbers.add(30);
// foreach:增强for循环(JDK 5+)
// 内部本质是使用Iterator实现的
for (int num : numbers) {
System.out.println(num); // 10, 20, 30
}
// foreach循环的局限
// 1. 遍历时不能修改集合(不能增删元素)
// 2. 无法获取当前元素的索引
// 需要在遍历中删除元素时 → 使用Iterator -
List的实现类对比
| 特性 | ArrayList | LinkedList |
|---|---|---|
| 底层结构 | 动态数组 | 双向链表 |
| 查询速度 | 快(O(1)) | 慢(O(n)) |
| 增删速度 | 慢(需移动元素) | 快(O(1),插入/删除头部) |
| 内存占用 | 紧凑 | 每个节点多两个指针 |
| 适用场景 | 多查询、少增删 | 多增删、少查询 |
🧪 2个练手题
以下2道题目用于巩固ArrayList和Iterator的使用
题目1 — ArrayList增删改查
创建一个ArrayList
- 批量添加元素:10, 20, 30, 40, 50
- 在索引2的位置插入25
- 将索引3的元素替换为35
- 删除索引0的元素
- 三种方式遍历输出最终结果(for循环、增强for、forEach)
点击查看答案
参考代码:
1 | import java.util.ArrayList; |
输出:
初始: [10, 20, 30, 40, 50]
插入后: [10, 20, 25, 30, 40, 50]
替换后: [10, 20, 25, 35, 40, 50]
删除后: [20, 25, 35, 40, 50]
题目2 — 迭代器安全删除
创建一个ArrayList
点击查看答案
参考代码:
1 | import java.util.ArrayList; |
输出:
删除前: [Java, Python, C++, Go, Rust]
删除后: [Java, Python, Rust]
关键点:遍历集合时如果要删除元素,必须使用Iterator的remove()方法。使用list.remove()或增强for循环中删除都会导致ConcurrentModificationException。
Iterator工作流程:hasNext()判断是否有下一个 → next()获取下一个 → 需要删除时调用remove()(删除的是刚刚next()返回的那个元素)。
Set 接口
-
HashSet 集合
1
2
3
4
5
6
7
8
9
10
11
12
13
14
15
16
17
18
19
20
21
22
23
24
25
26
27import java.util.HashSet;
import java.util.Set;
public class HashSetDemo {
public static void main(String[] args) {
Set<String> set = new HashSet<>();
// 添加元素(无序、不重复)
set.add("Java");
set.add("Python");
set.add("C++");
set.add("Java"); // 重复元素,添加失败(无提示)
System.out.println(set); // [Java, C++, Python](顺序不确定)
// 删除
set.remove("C++");
// 判断
System.out.println(set.contains("Java")); // true
System.out.println(set.size()); // 2
// 遍历(没有索引,只能用增强for或迭代器)
for (String s : set) {
System.out.println(s);
}
}
} -
HashSet 去重原理
HashSet 去重依赖于 hashCode() 和 equals() 两个方法。存入元素时,先比较哈希值,哈希值相同再调用equals比较内容
1
2
3
4
5
6
7
8
9
10
11
12
13
14
15
16
17
18
19
20
21
22
23
24
25
26
27
28
29
30
31
32
33
34
35
36
37
38
39
40
41
42
43
44import java.util.HashSet;
import java.util.Objects;
public class Student {
private String name;
private int age;
public Student(String name, int age) {
this.name = name;
this.age = age;
}
public String getName() { return name; }
public int getAge() { return age; }
// 必须同时重写 hashCode() 和 equals()
public boolean equals(Object o) {
if (this == o) return true;
if (o == null || getClass() != o.getClass()) return false;
Student student = (Student) o;
return age == student.age && Objects.equals(name, student.name);
}
public int hashCode() {
return Objects.hash(name, age);
}
public String toString() {
return "Student{name='" + name + "', age=" + age + "}";
}
public static void main(String[] args) {
HashSet<Student> students = new HashSet<>();
students.add(new Student("张三", 18));
students.add(new Student("张三", 18)); // 重写hashCode和equals后被视为重复
students.add(new Student("李四", 20));
System.out.println("集合大小: " + students.size()); // 2
System.out.println(students);
}
} -
LinkedHashSet
1
2
3
4
5
6
7
8import java.util.LinkedHashSet;
// LinkedHashSet:继承HashSet,使用链表维护插入顺序
LinkedHashSet<String> set = new LinkedHashSet<>();
set.add("C");
set.add("A");
set.add("B");
System.out.println(set); // [C, A, B](与插入顺序一致) -
TreeSet
TreeSet 基于红黑树实现,元素会自动按照自然顺序(或指定的比较器顺序)排序
1
2
3
4
5
6
7
8
9
10
11
12
13
14import java.util.TreeSet;
import java.util.Comparator;
TreeSet<Integer> set = new TreeSet<>();
set.add(5);
set.add(2);
set.add(8);
set.add(1);
System.out.println(set); // [1, 2, 5, 8](自动升序排列)
// TreeSet存储自定义对象需要实现Comparable接口或提供Comparator
TreeSet<Student> students = new TreeSet<>((s1, s2) -> {
return s1.getAge() - s2.getAge(); // 按年龄升序
});
🧪 2个练手题
以下2道题目用于巩固HashSet的去重原理和TreeSet的排序功能
题目1 — HashSet去重原理
定义一个Person类,包含name和age属性。在HashSet中存入以下对象,如果不重写hashCode()和equals(),集合大小是多少?重写后又是多少?
1 | Person p1 = new Person("张三", 18); |
点击查看答案
不重写hashCode和equals时:集合大小为3。因为Person继承了Object默认的hashCode和equals,比较的是内存地址。p1和p2虽然是"同一个人"(内容相同),但它们是两个不同的对象,地址不同,HashSet认为它们不重复。
重写后:集合大小为2。p1和p2的name和age相同,hashCode相同,equals也返回true,HashSet认为它们是重复元素,p2不会被添加进去。
重写代码:
1 |
|
HashSet去重流程:
- 计算新元素的hashCode
- 与已有元素的hashCode比较
- 如果hashCode相同,再调用equals比较内容
- 只有hashCode相同且equals返回true,才判定为重复
所以重写equals必须同时重写hashCode!
题目2 — TreeSet自然排序
创建一个TreeSet
点击查看答案
参考代码:
1 | import java.util.TreeSet; |
输出:
数字排序: [1, 2, 3, 5, 7, 9]
字符串排序: [apple, banana, cherry, date]
关键点:
- TreeSet自动对元素排序(升序),底层是红黑树
- Integer实现了Comparable接口(自然排序:从小到大)
- String也实现了Comparable接口(字典序:a-z)
- 如果TreeSet存入自定义对象,该对象必须实现Comparable接口或在创建TreeSet时传入Comparator,否则运行时报错ClassCastException
Map 接口
-
HashMap
1
2
3
4
5
6
7
8
9
10
11
12
13
14
15
16
17
18
19
20
21
22
23
24
25
26
27
28
29
30
31import java.util.HashMap;
import java.util.Map;
public class HashMapDemo {
public static void main(String[] args) {
Map<String, Integer> map = new HashMap<>();
// 添加键值对(如果key已存在,会覆盖旧值并返回旧值)
map.put("张三", 95);
map.put("李四", 88);
map.put("王五", 92);
map.put("张三", 97); // 覆盖旧值 95,返回 95
System.out.println(map); // {李四=88, 张三=97, 王五=92}(无序)
// 获取元素
System.out.println(map.get("张三")); // 97
System.out.println(map.get("不存在的key")); // null
// 安全获取(不存在时返回默认值)
System.out.println(map.getOrDefault("赵六", 0)); // 0
// 删除
map.remove("王五");
// 判断
System.out.println(map.containsKey("张三")); // true
System.out.println(map.containsValue(88)); // true
System.out.println(map.size()); // 2
System.out.println(map.isEmpty()); // false
}
} -
Map的遍历方式
1
2
3
4
5
6
7
8
9
10
11
12
13
14
15
16
17
18
19
20
21
22
23
24
25Map<String, Integer> map = new HashMap<>();
map.put("张三", 95);
map.put("李四", 88);
map.put("王五", 92);
// 方式1:通过keySet遍历(先获取所有key,再通过key获取value)
System.out.println("=== 方式1: keySet ===");
for (String key : map.keySet()) {
System.out.println(key + " → " + map.get(key));
}
// 方式2:通过entrySet遍历(推荐,效率最高)
System.out.println("=== 方式2: entrySet ===");
for (Map.Entry<String, Integer> entry : map.entrySet()) {
System.out.println(entry.getKey() + " → " + entry.getValue());
}
// 方式3:forEach + Lambda(JDK 8+)
System.out.println("=== 方式3: forEach ===");
map.forEach((key, value) -> System.out.println(key + " → " + value));
// 方式4:只遍历values(不关心key时使用)
for (int score : map.values()) {
System.out.println("分数: " + score);
} -
LinkedHashMap 和 TreeMap
1
2
3
4
5
6
7
8
9
10
11
12
13// LinkedHashMap:维护插入顺序
Map<String, Integer> linkedMap = new LinkedHashMap<>();
linkedMap.put("C", 3);
linkedMap.put("A", 1);
linkedMap.put("B", 2);
System.out.println(linkedMap); // {C=3, A=1, B=2}(插入顺序)
// TreeMap:按照key自然顺序(或比较器)排序
Map<String, Integer> treeMap = new TreeMap<>();
treeMap.put("C", 3);
treeMap.put("A", 1);
treeMap.put("B", 2);
System.out.println(treeMap); // {A=1, B=2, C=3}(按key排序) -
Map的实现类对比
| 特性 | HashMap | LinkedHashMap | TreeMap |
|---|---|---|---|
| 底层结构 | 哈希表+链表/红黑树 | 哈希表+双向链表 | 红黑树 |
| key顺序 | 无序 | 插入顺序 | key排序 |
| null键 | 允许一个 | 允许一个 | 不允许 |
| 性能 | O(1) | O(1) | O(log n) |
🧪 2个练手题
以下2道题目用于巩固HashMap的基本操作和Map的遍历方式
题目1 — HashMap基本操作
创建一个HashMap<String, String>作为简化的"手机通讯录":key是姓名,value是电话号码。添加3个联系人,然后做以下操作:
- 根据某个姓名查找电话号码
- 查找一个不存在的姓名,使用getOrDefault返回"未找到"
- 判断通讯录中是否包含"张三"
- 输出通讯录中所有联系人的姓名
点击查看答案
参考代码:
1 | import java.util.HashMap; |
输出:
通讯录: {李四=13900002222, 张三=13800001111, 王五=13700003333}
张三的电话: 13800001111
赵六的电话: 未找到
有张三? true
=== 所有联系人 ===
李四
张三
王五
注意:HashMap是无序的,输出的顺序和插入顺序可能不一致。
题目2 — Map的entrySet遍历
创建一个HashMap<String, Integer>存储水果价格(苹果=10, 香蕉=5, 橘子=8, 西瓜=15)。使用entrySet遍历并输出格式"水果名: XX元/斤"。最后找出价格最高的水果。
点击查看答案
参考代码:
1 | import java.util.HashMap; |
输出:
=== 水果价格表 ===
苹果: 10元/斤
香蕉: 5元/斤
橘子: 8元/斤
西瓜: 15元/斤
最贵的水果: 西瓜(15元/斤)
关键点:entrySet() 是遍历Map效率最高的方式,一次遍历同时获取key和value。Map.Entry是Map的内部接口,通过getKey()和getValue()访问。
泛型
-
泛型的好处
1
2
3
4
5
6
7
8
9
10
11
12// 不使用泛型(JDK 5之前)
List list = new ArrayList();
list.add("Hello");
list.add(123); // 可以添加任何类型
String str = (String) list.get(0); // 需要强制转换
// String s = (String) list.get(1); // 运行时 ClassCastException!
// 使用泛型(编译时类型检查)
List<String> list2 = new ArrayList<>();
list2.add("Hello");
// list2.add(123); // 编译错误!类型不匹配,在编译期就能发现
String str2 = list2.get(0); // 不需要强制转换 -
泛型类
1
2
3
4
5
6
7
8
9
10
11
12
13
14
15
16
17
18
19
20
21
22
23// 定义泛型类(T 是类型参数,通常用 T/E/K/V 等)
public class Box<T> {
private T content;
public void set(T content) {
this.content = content;
}
public T get() {
return content;
}
// 使用
public static void main(String[] args) {
Box<String> strBox = new Box<>();
strBox.set("Java");
System.out.println(strBox.get()); // Java
Box<Integer> intBox = new Box<>();
intBox.set(100);
System.out.println(intBox.get()); // 100
}
} -
泛型方法
1
2
3
4
5
6
7
8
9
10
11
12
13
14
15
16
17public class Utils {
// 泛型方法:在返回值类型前声明类型参数
public static <T> void printArray(T[] arr) {
for (T element : arr) {
System.out.print(element + " ");
}
System.out.println();
}
public static void main(String[] args) {
String[] strings = {"Java", "Python", "C++"};
Integer[] integers = {1, 2, 3};
Utils.printArray(strings); // Java Python C++
Utils.printArray(integers); // 1 2 3
}
} -
泛型接口
1
2
3
4
5
6
7
8
9
10
11
12
13
14// 泛型接口
public interface Repository<T> {
void save(T entity);
T findById(int id);
}
// 实现时指定具体类型
public class UserRepository implements Repository<User> {
public void save(User entity) { /* ... */ }
public User findById(int id) { /* ... */ }
} -
泛型通配符
1
2
3
4
5
6
7
8
9
10
11
12
13
14
15
16
17
18
19
20
21
22
23// ? 表示未知类型
// ? extends T:上界通配符,必须是T或其子类
// ? super T:下界通配符,必须是T或其父类
// 上界通配符(读数据)
public static void printNumbers(List<? extends Number> list) {
for (Number n : list) {
System.out.println(n);
}
}
List<Integer> intList = new ArrayList<>();
intList.add(1); intList.add(2);
printNumbers(intList); // Integer 是 Number 的子类
// 下界通配符(写数据)
public static void addNumbers(List<? super Integer> list) {
list.add(10);
list.add(20);
}
List<Number> numList = new ArrayList<>();
addNumbers(numList); // Number 是 Integer 的父类
口诀:PECS —— Producer Extends(取数据用上界),Consumer Super(存数据用下界)
🧪 2个练手题
以下2道题目用于巩固泛型类和泛型方法
题目1 — 自定义泛型类
定义一个泛型类Pair
点击查看答案
参考代码:
1 | public class Pair<T> { |
输出:
String: Pair(左, 右)
交换后: Pair(右, 左)
Integer: Pair(1, 2)
交换后: Pair(2, 1)
关键点:泛型类在定义时使用
题目2 — 泛型方法
定义一个泛型方法printMiddle,接收一个任意类型的数组,输出数组的中间元素(如果数组长度为奇数输出正中间,偶数输出中间两个)。分别用String数组和Integer数组测试。
点击查看答案
参考代码:
1 | public class ArrayUtils { |
输出:
中间元素: C
中间两个: 2, 3
关键点:
- 泛型方法的
要写在返回值类型前面 - 调用时不必显式指定类型,编译器自动推断
- 泛型方法可以定义在普通类中,不要求类本身是泛型类
Lambda 表达式
-
Lambda的基本语法
1
2
3
4
5
6
7
8
9
10
11
12
13
14
15
16
17
18
19
20/*
* 格式:(参数列表) -> { 方法体 }
*
* 简化规则:
* 1. 参数类型可以省略
* 2. 如果只有一个参数,小括号可以省略
* 3. 如果方法体只有一条语句,花括号、分号、return可省略
*/
// 对比:匿名内部类 vs Lambda
// 匿名内部类(传统写法)
Runnable task1 = new Runnable() {
public void run() {
System.out.println("Hello from 匿名内部类");
}
};
// Lambda表达式
Runnable task2 = () -> System.out.println("Hello from Lambda"); -
Lambda的各种简化形式
1
2
3
4
5
6
7
8
9
10
11
12
13
14// 无参,一条语句
Runnable r1 = () -> System.out.println("Hello");
// 一个参数,省略括号和类型
// Consumer<String> consumer = s -> System.out.println(s);
// 多个参数
// Comparator<Integer> comp = (a, b) -> a - b;
// 多条语句,必须加花括号和return
// Comparator<Integer> comp2 = (a, b) -> {
// System.out.println("a = " + a + ", b = " + b);
// return a - b;
// }; -
Lambda 配合常见函数式接口
1
2
3
4
5
6
7
8
9
10
11
12
13
14
15
16
17
18
19
20
21
22
23
24
25import java.util.Arrays;
import java.util.List;
import java.util.function.*;
public class LambdaDemo {
public static void main(String[] args) {
List<String> names = Arrays.asList("张三", "李四", "王五");
// Consumer:接收一个参数,无返回值
names.forEach(System.out::println); // 方法引用(更简洁)
// Predicate:接收一个参数,返回boolean(用于过滤)
names.removeIf(s -> s.startsWith("张"));
System.out.println(names); // [李四, 王五]
// Function:接收一个参数,返回一个结果(用于转换)
names.replaceAll(s -> s.toUpperCase());
System.out.println(names); // [李四, 王五]
// Comparator:比较两个参数
List<Integer> numbers = Arrays.asList(5, 2, 8, 1, 9);
numbers.sort((a, b) -> b - a); // 降序排列
System.out.println(numbers); // [9, 8, 5, 2, 1]
}
} -
方法引用(Method Reference)
方法引用是Lambda的更简写法,当Lambda只是调用一个已有的方法时,可以使用方法引用
| 类型 | 格式 | Lambda | 方法引用 |
|---|---|---|---|
| 静态方法 | Class::staticMethod | x -> Math.abs(x) | Math::abs |
| 实例方法 | object::method | x -> obj.foo(x) | obj::foo |
| 类实例方法 | Class::method | (x, y) -> x.equals(y) | String::equals |
| 构造方法 | Class::new | () -> new Student() | Student::new |
1 | // 方法引用示例 |
-
Stream 流简介
1
2
3
4
5
6
7
8
9
10
11
12
13
14
15
16
17
18
19
20
21
22
23
24
25
26
27import java.util.Arrays;
import java.util.List;
import java.util.stream.Collectors;
// Stream + Lambda 的强大组合
List<String> names = Arrays.asList("张三", "李四丰", "王五", "赵六丰丰");
// 过滤 + 转换 + 收集 —— 一条龙操作
List<String> result = names.stream()
.filter(s -> s.length() > 2) // 过滤:姓名长度 > 2
.map(s -> s.substring(0, 1)) // 映射:只取第一个字
.sorted() // 排序
.collect(Collectors.toList()); // 收集为List
System.out.println(result); // [李, 赵]
// 更多Stream操作
List<Integer> numbers = Arrays.asList(1, 2, 3, 4, 5, 6, 7, 8, 9, 10);
numbers.stream()
.filter(n -> n % 2 == 0) // 过滤偶数
.map(n -> n * n) // 平方
.forEach(System.out::println); // 打印: 4 16 36 64 100
// 统计
long count = numbers.stream().filter(n -> n > 5).count();
System.out.println(">5的数个数: " + count); // 5
🧪 2个练手题
以下2道题目用于巩固Lambda表达式的简化和Stream流的基本操作
题目1 — Lambda表达式简化
将以下匿名内部类改写为Lambda表达式,并逐步简化到最简形式:
1 | // 原始匿名内部类 |
点击查看答案
逐步简化过程:
1 | // 第1步:去掉匿名内部类外壳,保留参数和方法体 |
简化规则:
- 参数类型可以省略
- 单个参数可省略括号
- 方法体只有一条语句可省略花括号和return
题目2 — Stream过滤与映射
给定一个整数列表 [15, 8, 22, 9, 31, 6, 18, 7],使用Stream完成以下操作:
- 过滤出所有偶数
- 将每个偶数乘以2
- 排序后收集为List并输出
要求:用一条Stream链式调用完成。
点击查看答案
参考代码:
1 | import java.util.Arrays; |
输出:
原始: [15, 8, 22, 9, 31, 6, 18, 7]
结果: [12, 16, 36, 44]
大于10的元素个数: 5
奇数之和: 62
Stream三件套:
- filter:过滤,留下满足条件的元素
- map:映射/转换,将元素变成另一种形式
- collect:收集,将Stream转回List/Set等集合
常用终结操作:collect(收集)、forEach(遍历)、count(计数)、sum(求和)
综合练习
将所学的Java知识融会贯通,通过以下练习巩固面向对象、集合、Lambda、异常处理等核心知识点
练习一:学生管理系统
1 | import java.util.*; |
练习二:自定义泛型栈
1 | import java.util.Arrays; |
练习三:HashMap 单词计数
1 | import java.util.*; |
练习四:日期时间工具类
1 | import java.time.*; |
以上综合练习涵盖了面向对象、封装、继承、多态、异常处理、集合、泛型、Lambda表达式、日期时间等核心知识点。建议先自己动手写一遍,再看参考答案。编程是一门实践性学科,多写多练才能真正掌握!
Java Study Note 系列文章